Deleted member 65051
Guest
- Thread starter
- #1
I did a lot of research on this before I pulled the trigger. Many S650 owners opted for the Pioneer TS-A250D4 of which most forum members claim is a very satisfactory speaker replacement. I went the Pioneer route, but opted for the upgraded TS-D10D4 ($120 on Amazon). Since I was NOT installing a stand-alone amp to power this thing and I am relying on the OEM B&O Amp, I went with this unit because it has dual 4-ohm drivers, a little bit more throw, frequency range (20Hz to 6.6 kHz), slightly higher speaker efficiency (76dB), butyl rubber surround and and a spider fiber cone. NOTE: Both Pioneer units fit exactly the same, slightly off from the factory OEM mount holes, but real close.
First, I removed the sub and housing from the trunk. Simply removed three 13mm bolts and I disconnected the wire connector plug in the rear. I took the whole unit out of the trunk and over to my work bench for the speaker swap over process.
Second, as with many forum members, I found it difficult to remove the outer trim ring. Yes, I broke a few of the stud/clips while removing the ring. I fixed this with a different solution of which I will describe later in Step 8.
Third, once the outer trim ring was off, I found it very simple to swap over the speakers. 1) I removed the six Torx screws. 2) Set aside the OEM grille cover. 3) Gently put a flathead screw driver behind the speaker steel basket outer ring to pry the speaker away from the housing (it has a sticky seal around the inner diameter of the speaker basket outer mount ring). 4) This freed up the old speaker and I simply disconnected the two wire connectors from the OEM speaker. 5) OEM Speaker is now free and out of the way.
Fourth, I took the new Pioneer speaker of the the box and test fit it. The 6-mount hole diameter is slightly smaller so the mount holes WILL NOT ALIGN with the OEM enclosure. Thus, I took my wire cutter (side cuts) then snipped out all six mount holes to form a "V" at each mount hole. (Some others write they used a Dremel cutter wheel but I didn't want metal shavings and metal dust to attract to the new speaker's magnet). Then I took a file and smoothed down the rough edges so that I would have a flat surface for the screw heads. I then test fit the speaker again. SUCCESS. The six OEM Torx screws will now work to secure the speaker utilizing the OEM factory mount holes of the enclosure.
Fifth. I took some 1/4" weatherstrip foam and run a bead around the entire circumference of the inner speaker basket mount ring.
Sixth. I snipped off the OEM wire connectors, stripped back the wire ends and installed some 8" extensions onto the existing wires using crimp splices. I wrapped the wires and splices in black tape the full length of the extensions up to the speaker connection points. Since the Pioneer Speaker uses spring loaded wire connectors, I easily stripped back the wire extension ends and simply inserted them in the connector holes (Pioneer made it real simple). Green/Yellow are POSITIVE. Black/Purple are NEGATIVE.
Seven. Now that the new speaker is ready to install (wires connected and foam seal on the inner side of the mount ring), I fitted the enclosure with a layer of fiber fill blanket material then placed the speaker into the opening of the enclosure. I aligned the mount holes, placed the OEM grille cover in its position and re-installed the 6 OEM, Torx screws. Now the speaker is mounted to the enclosure.
Eight. Since I broke off some of the stud/clips on the outer trim ring, I decided to put the trim ring back in its position then I drilled (2) holes on the "tabs" of the trim ring and installed (2) black phillips-head sheet metal screws to secure the trim ring. DO NOT OVER-TIGHTEN. You are using plastic to secure this trim ring.
Nine. I re-installed the Subwoofer unit in the trunk in reverse order from Step 1.
Ok, now it's time to test it. I started the car and played some music that I knew had some strong bass play. This speaker will NOT rattle your windows (of which I WAS NOT looking for), but it definitely added that missing bass "thump" I was looking for. It blends the low-end bass very well with the other (11) speakers and adds that "thump" that was missing with the OEM speaker. End result, I am very happy with the finished product and its sound and it only took maybe 1-hour, 15-minutes to complete start-to-finish
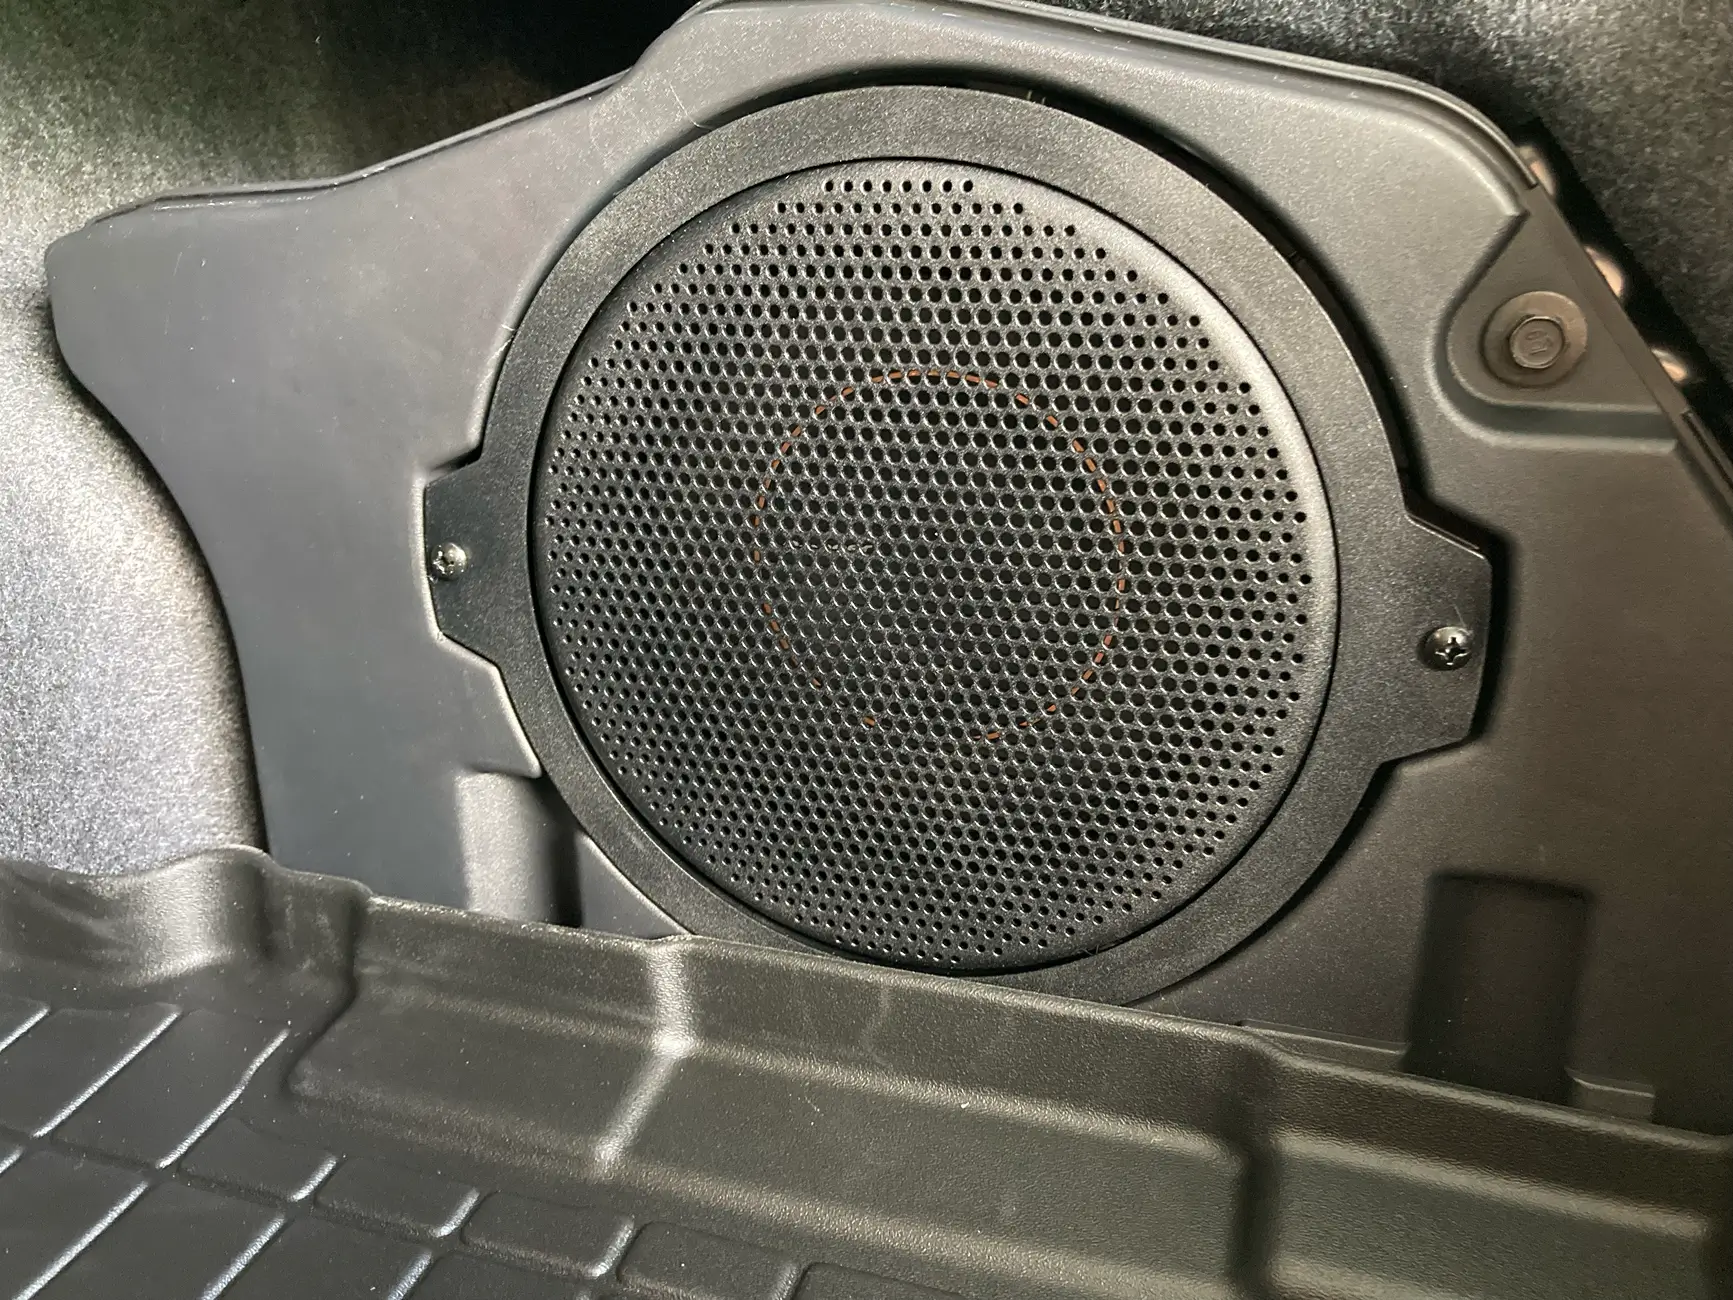
Photo attached of the finished product, Note the added (2) black head screws on the outer ring tabs.

First, I removed the sub and housing from the trunk. Simply removed three 13mm bolts and I disconnected the wire connector plug in the rear. I took the whole unit out of the trunk and over to my work bench for the speaker swap over process.
Second, as with many forum members, I found it difficult to remove the outer trim ring. Yes, I broke a few of the stud/clips while removing the ring. I fixed this with a different solution of which I will describe later in Step 8.
Third, once the outer trim ring was off, I found it very simple to swap over the speakers. 1) I removed the six Torx screws. 2) Set aside the OEM grille cover. 3) Gently put a flathead screw driver behind the speaker steel basket outer ring to pry the speaker away from the housing (it has a sticky seal around the inner diameter of the speaker basket outer mount ring). 4) This freed up the old speaker and I simply disconnected the two wire connectors from the OEM speaker. 5) OEM Speaker is now free and out of the way.
Fourth, I took the new Pioneer speaker of the the box and test fit it. The 6-mount hole diameter is slightly smaller so the mount holes WILL NOT ALIGN with the OEM enclosure. Thus, I took my wire cutter (side cuts) then snipped out all six mount holes to form a "V" at each mount hole. (Some others write they used a Dremel cutter wheel but I didn't want metal shavings and metal dust to attract to the new speaker's magnet). Then I took a file and smoothed down the rough edges so that I would have a flat surface for the screw heads. I then test fit the speaker again. SUCCESS. The six OEM Torx screws will now work to secure the speaker utilizing the OEM factory mount holes of the enclosure.
Fifth. I took some 1/4" weatherstrip foam and run a bead around the entire circumference of the inner speaker basket mount ring.
Sixth. I snipped off the OEM wire connectors, stripped back the wire ends and installed some 8" extensions onto the existing wires using crimp splices. I wrapped the wires and splices in black tape the full length of the extensions up to the speaker connection points. Since the Pioneer Speaker uses spring loaded wire connectors, I easily stripped back the wire extension ends and simply inserted them in the connector holes (Pioneer made it real simple). Green/Yellow are POSITIVE. Black/Purple are NEGATIVE.
Seven. Now that the new speaker is ready to install (wires connected and foam seal on the inner side of the mount ring), I fitted the enclosure with a layer of fiber fill blanket material then placed the speaker into the opening of the enclosure. I aligned the mount holes, placed the OEM grille cover in its position and re-installed the 6 OEM, Torx screws. Now the speaker is mounted to the enclosure.
Eight. Since I broke off some of the stud/clips on the outer trim ring, I decided to put the trim ring back in its position then I drilled (2) holes on the "tabs" of the trim ring and installed (2) black phillips-head sheet metal screws to secure the trim ring. DO NOT OVER-TIGHTEN. You are using plastic to secure this trim ring.
Nine. I re-installed the Subwoofer unit in the trunk in reverse order from Step 1.
Ok, now it's time to test it. I started the car and played some music that I knew had some strong bass play. This speaker will NOT rattle your windows (of which I WAS NOT looking for), but it definitely added that missing bass "thump" I was looking for. It blends the low-end bass very well with the other (11) speakers and adds that "thump" that was missing with the OEM speaker. End result, I am very happy with the finished product and its sound and it only took maybe 1-hour, 15-minutes to complete start-to-finish
Photo attached of the finished product, Note the added (2) black head screws on the outer ring tabs.
Sponsored

")