karlzhao314
New Member
- Thread starter
- #1
Hello everyone! New to the forums, happy to be here. I figured I’d go ahead and share what I did to upgrade my base GT with the factory heated steering wheel. It’s absolutely doable, and while it does involve some basic wiring, it’s something that I think most people should be able to handle at home easily.
Before we begin, though, I’d like to note that this upgrade will cost in the neighborhood of $650-$1300, depending on your source and condition for parts. There’s an argument to be made here that if you are looking for a new car and want the heated steering wheel, you should just consider getting the Premium to begin with, unless the heated steering wheel is the only premium feature you want (this is technically cheaper than upgrading to a Premium). However, if you’re like me and already have a base car, but found out after the fact that your fingers freeze off every morning with the cold leather wheel, this upgrade is a hell of a lot more cost effective than trading in for a Premium.
So, what’s actually involved?
The outline is:
Parts and tools
The parts you will need are:
The tools you will need are:
Let’s get in to the actual upgrade.
Installing the Heated Steering Wheel
Step 1: Before doing any hardware work, use FORScan to back up your as-built data for the SCCM. This is not a “just in case” step! You will need the as-built data to flash to your new SCCM later.
Step 2: Make your wiring assembly using the pigtail, some 16AWG wire, the fuse tap, and the ring terminal. The connector pinout is as follows:
 Connect the positive pin to the fuse tap. Connect the negative pin to the ¼” ring terminal.

My hardware store was out of black wire, so I got blue instead.
Mine was about 6 feet long, but ended up a bit long and required me to loop it and zip tie it down. That said, slightly too long is better than slightly too short.
Use a 10A fuse in the upper slot of the fuse tap, and a 5A fuse in the lower slot. The upper slot will power the ~7A heated steering wheel. The lower slot will power the mirror.
Step 3: Remove the battery cover. Disconnect the negative terminal of your car battery. You don’t want to be working on live airbags. Wait 2-10 minutes for the car to discharge, depending on how paranoid you are.
Step 4: Release the airbag and remove the steering wheel (T50 Torx Plus). There are videos online about how to do this.
Note that most tutorials online seem to use standard Torx bits for the steering wheel bolt, possibly because whoever made them was not aware of the difference between Torx and Torx Plus. I do not recommend this. While Torx bits work in Torx Plus fasteners in a pinch, they are not as secure, and you run a greater risk of mangling the bolt head - especially at the torque levels involved here. I would recommend getting a proper T50 Torx Plus bit, even if it is harder to find.
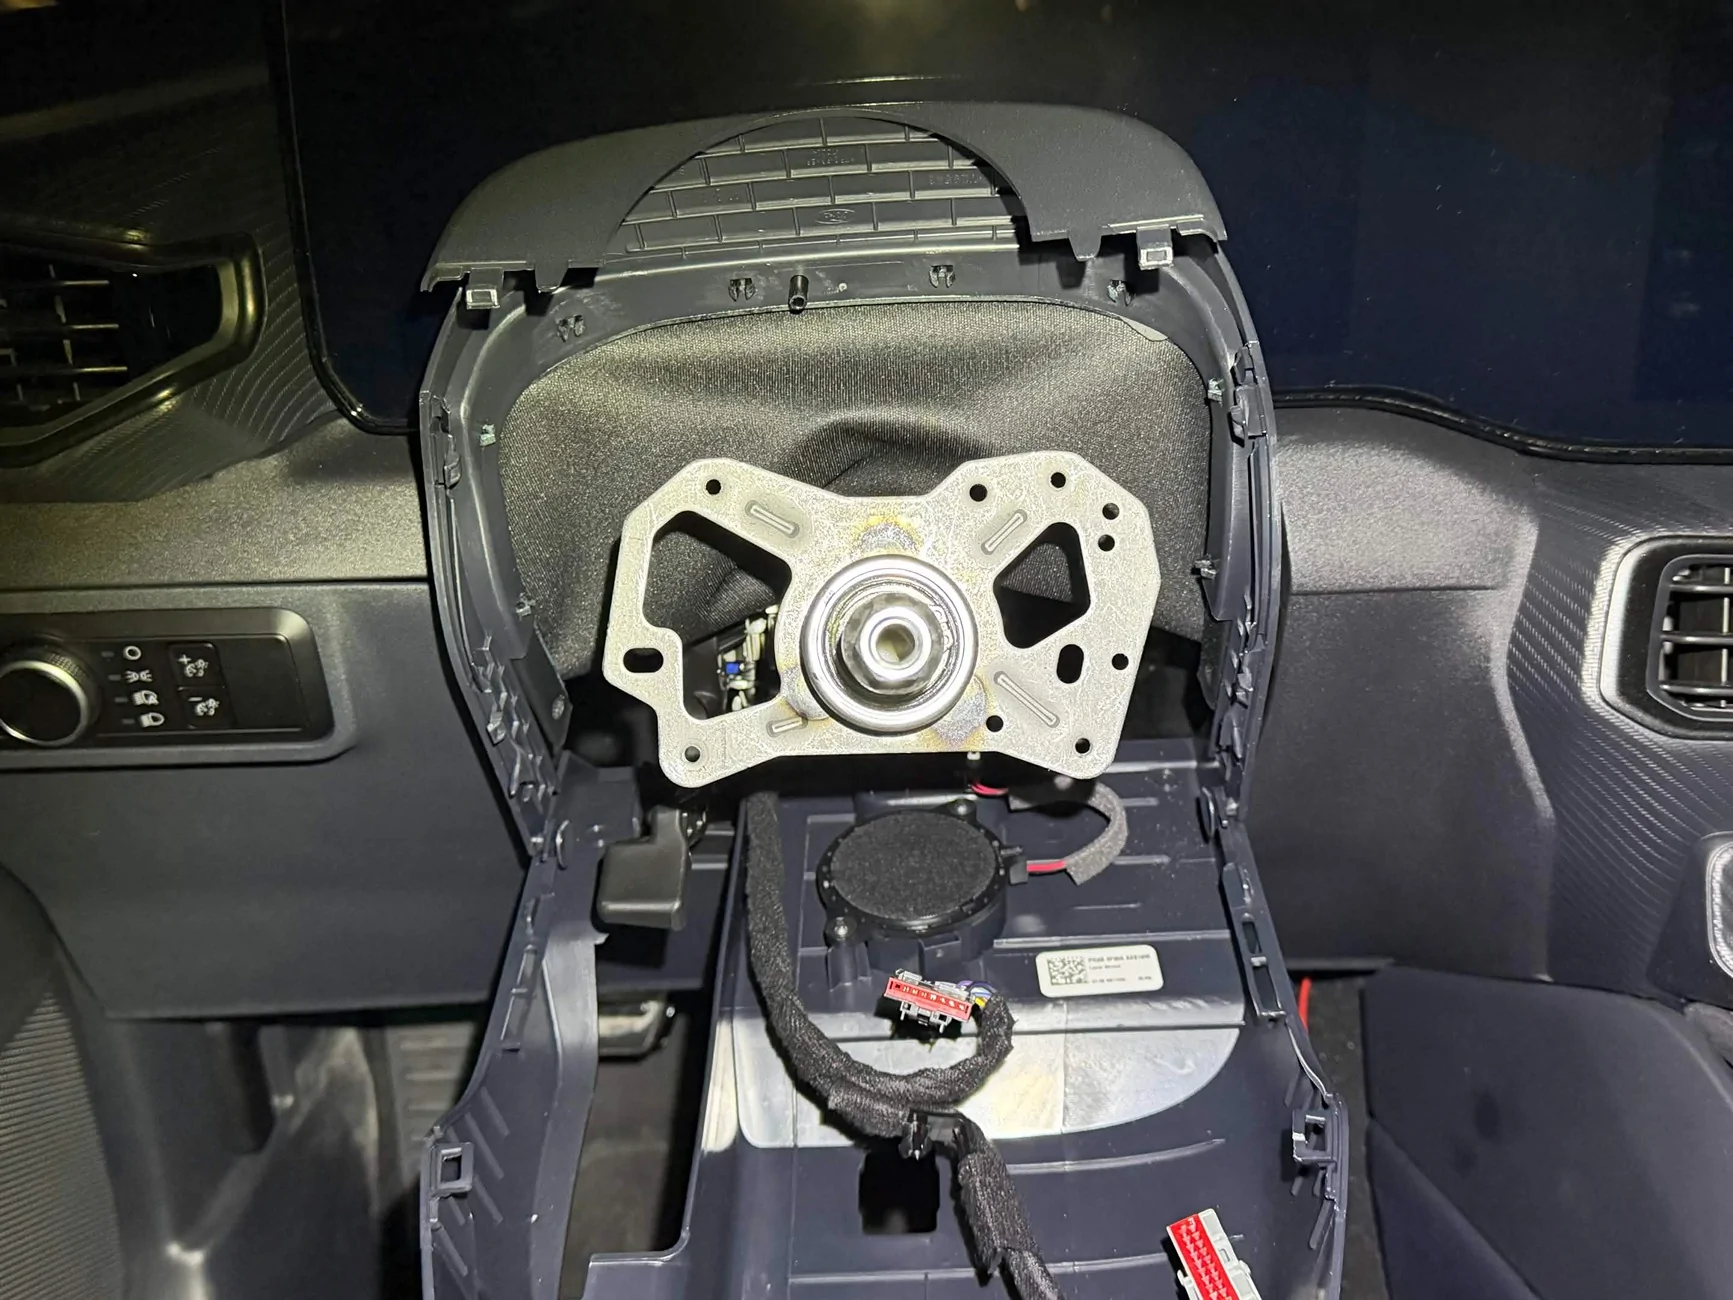
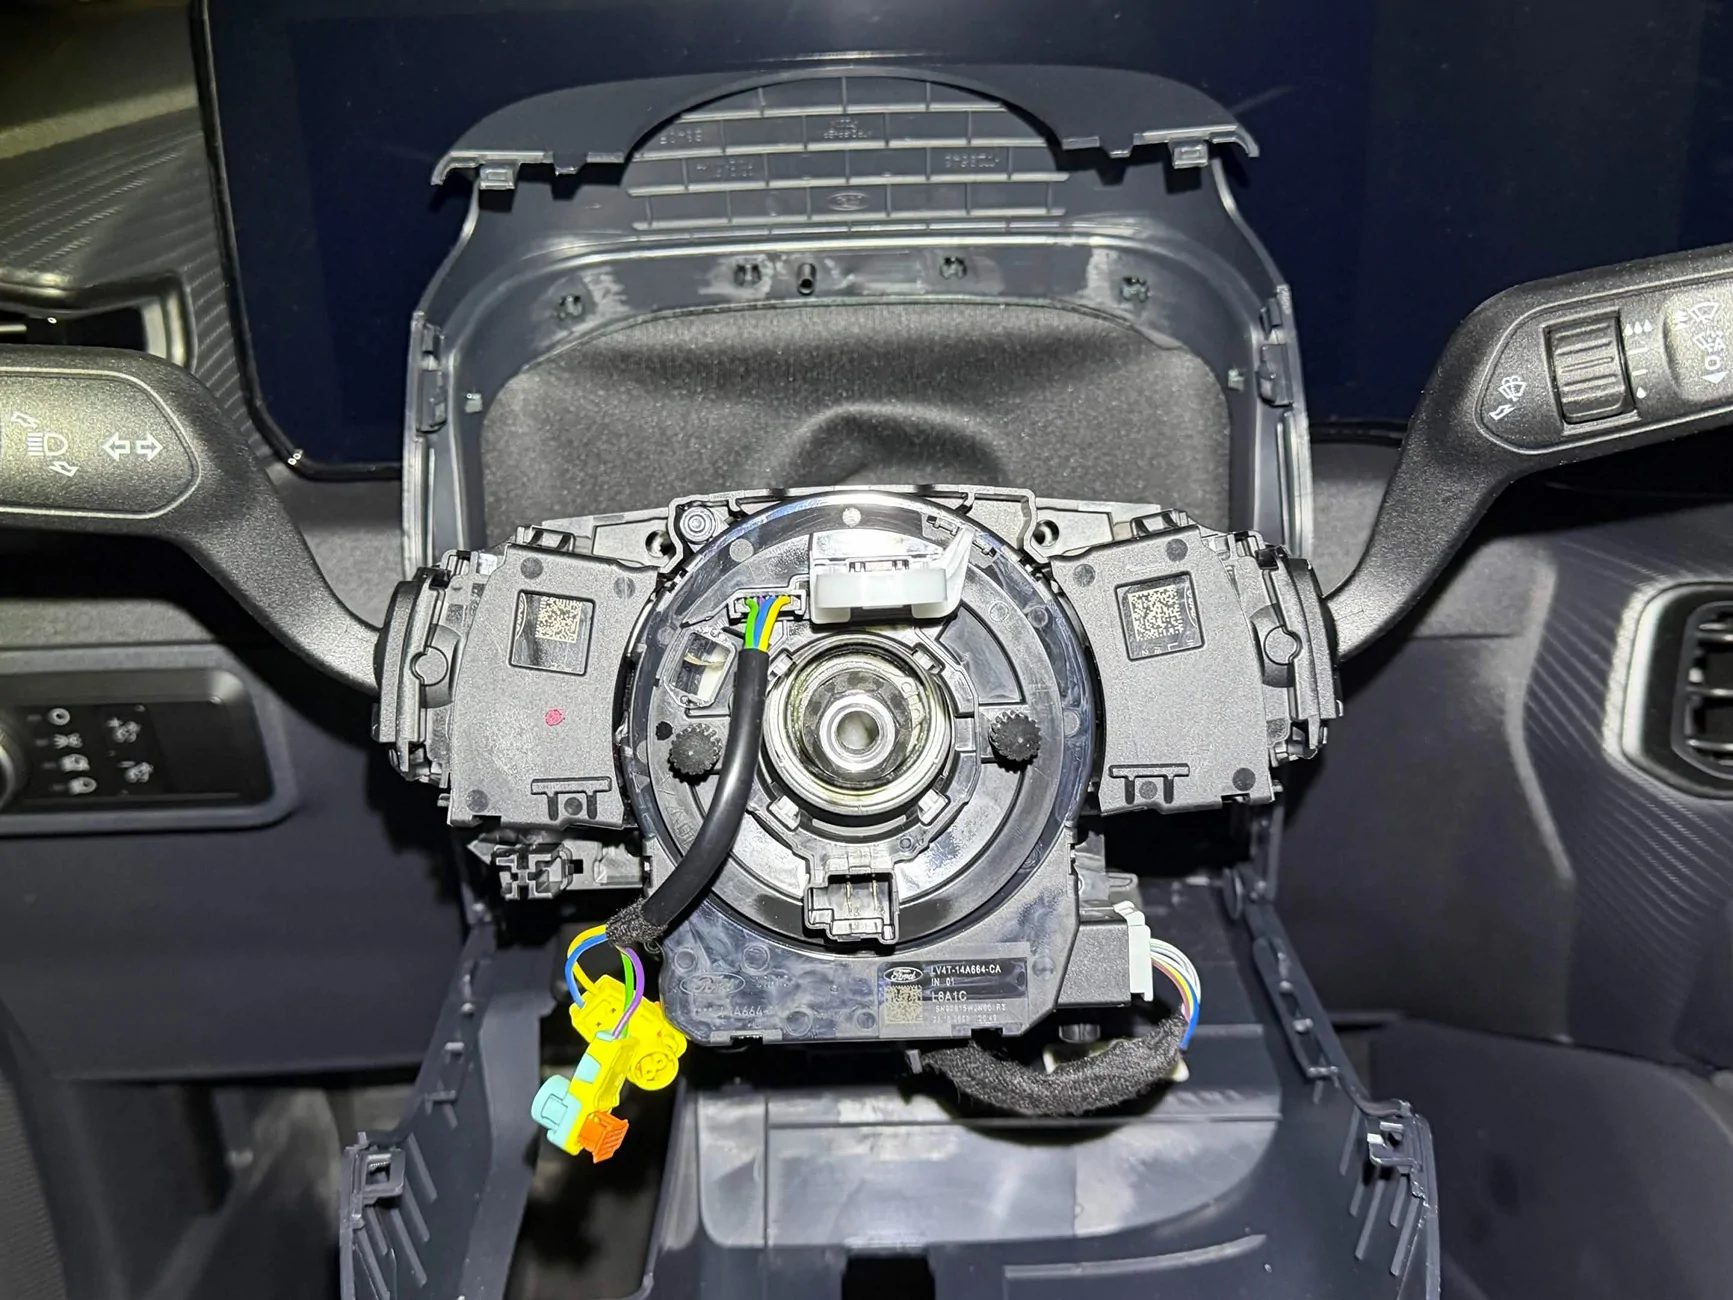
What you should be left with after you remove the steering wheel.
Step 5: Transfer all of your steering wheel controls and the airbag clips over to the new steering wheel. There are videos online about how to do this. Do not reinstall your steering wheel yet.
Step 6: Pull your steering column all the way out, and raise it to the highest position.
This needs to be done to access the third lower trim screw, but I would recommend keeping it here throughout the entire install. You want the steering column all the way out when you install and tie down the new wire to ensure you have sufficient wire length to retain all adjustability of your steering column.
Step 7: Unclip and release the steering column trim and let it hang free. The upper trim should unclip and release fairly easily by hand. The lower trim will require you to remove three screws from under the steering column using a 7mm socket. The last screw in the very back is the one where a deep socket or an extension is helpful.

Ignore box 3, that is the connector for the steering column speaker. It is not necessary to disconnect it unless you want to remove the trim panel altogether, which we won't need to do.
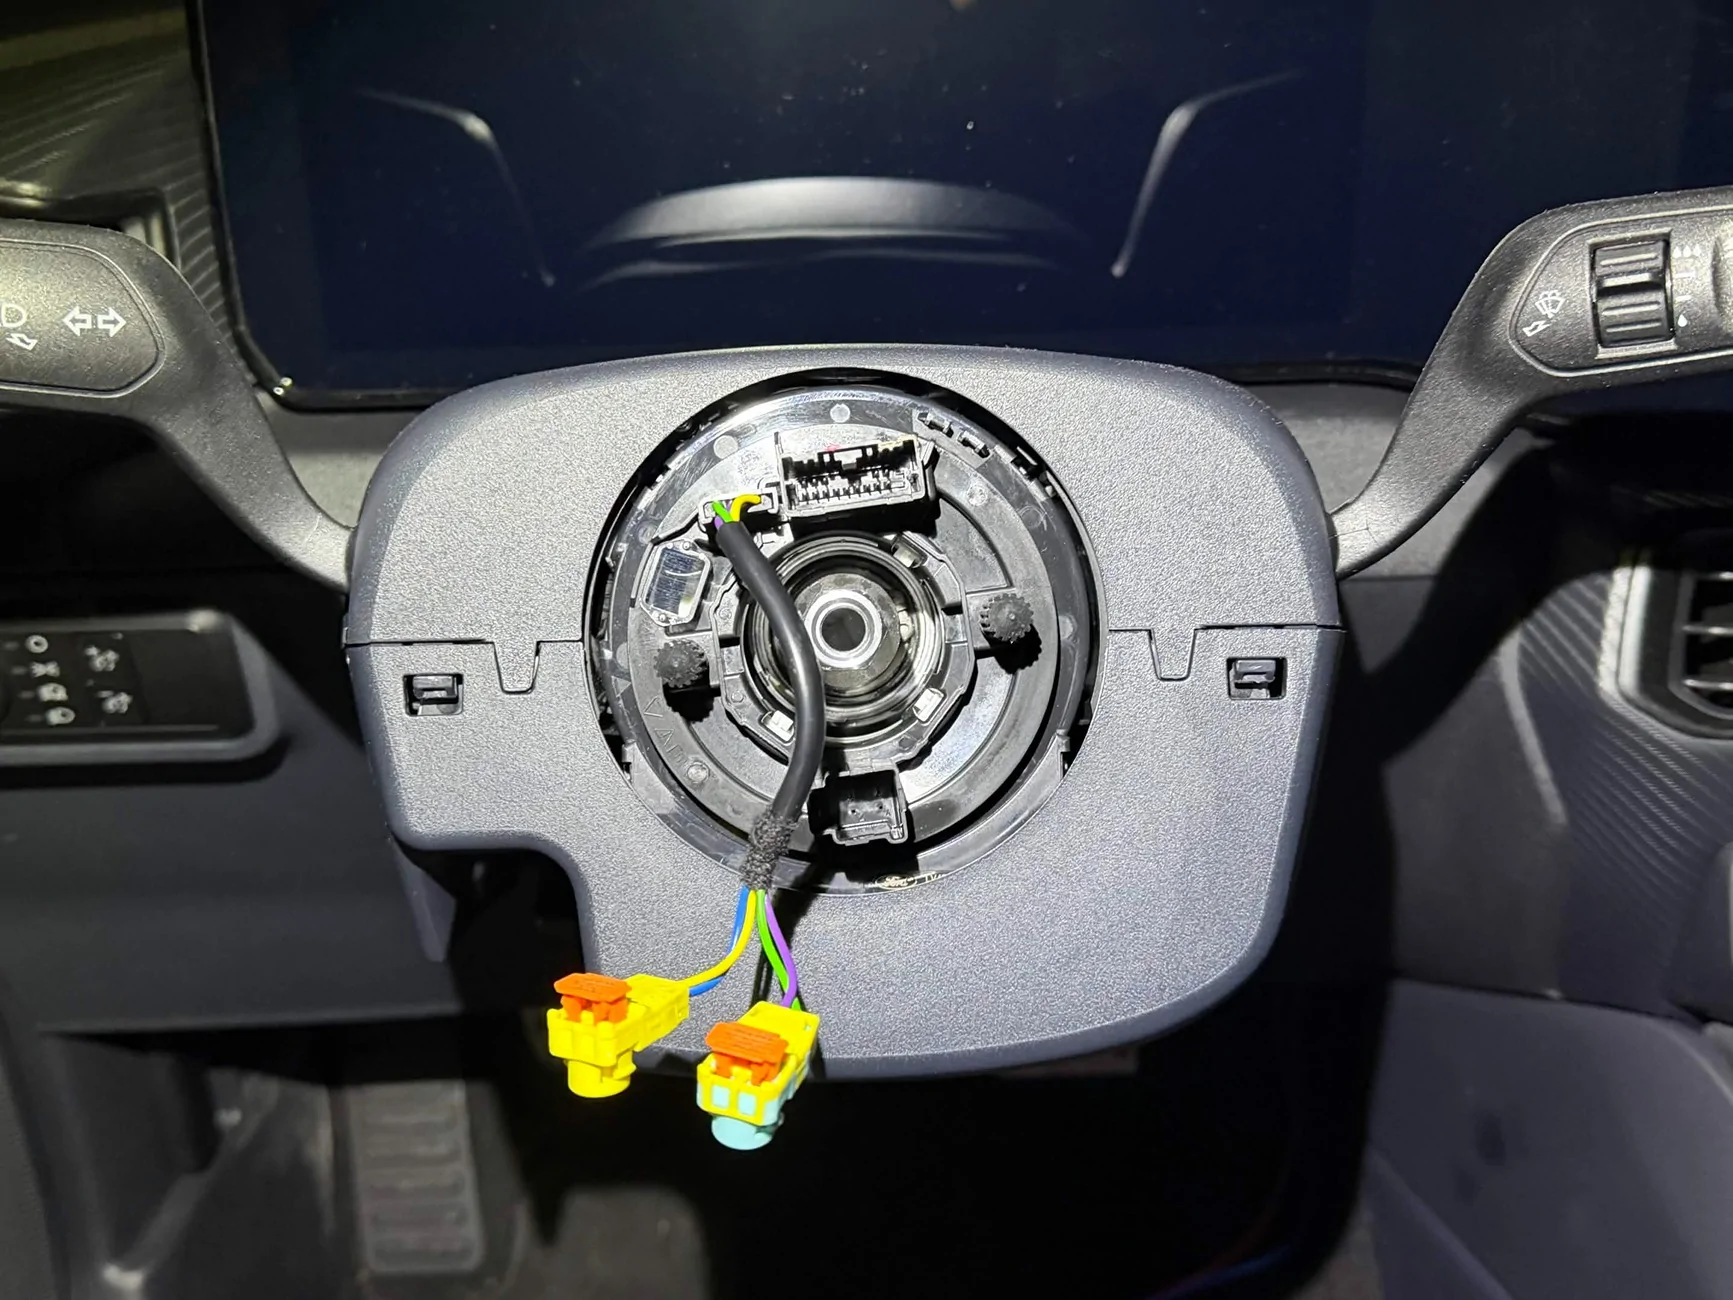
Step 8: Remove the 4 T25 screws holding the steering column electronics assembly to the steering column.
 Unplug the electrical connectors: there will be one behind the SCCM, and one to the right of the clock spring.
After that, the assembly will still be retained to the steering column by four clips. Unclip and remove the steering column electronics assembly.
Step 9: Start working on the passenger side. Remove the BCM cover in the passenger side footwell (the BCM cover comes out when you pull out to unclip, then slide up to release it from the passenger side footwell trim).
Step 10: Loosen or remove the passenger side door sill trim. This should come out fairly easy with a firm yank upwards, just be careful of how it goes together with the weather seal.

Step 11: Remove the passenger side footwell trim. Again, this should come out fairly easily with a firm yank towards the back of the car.
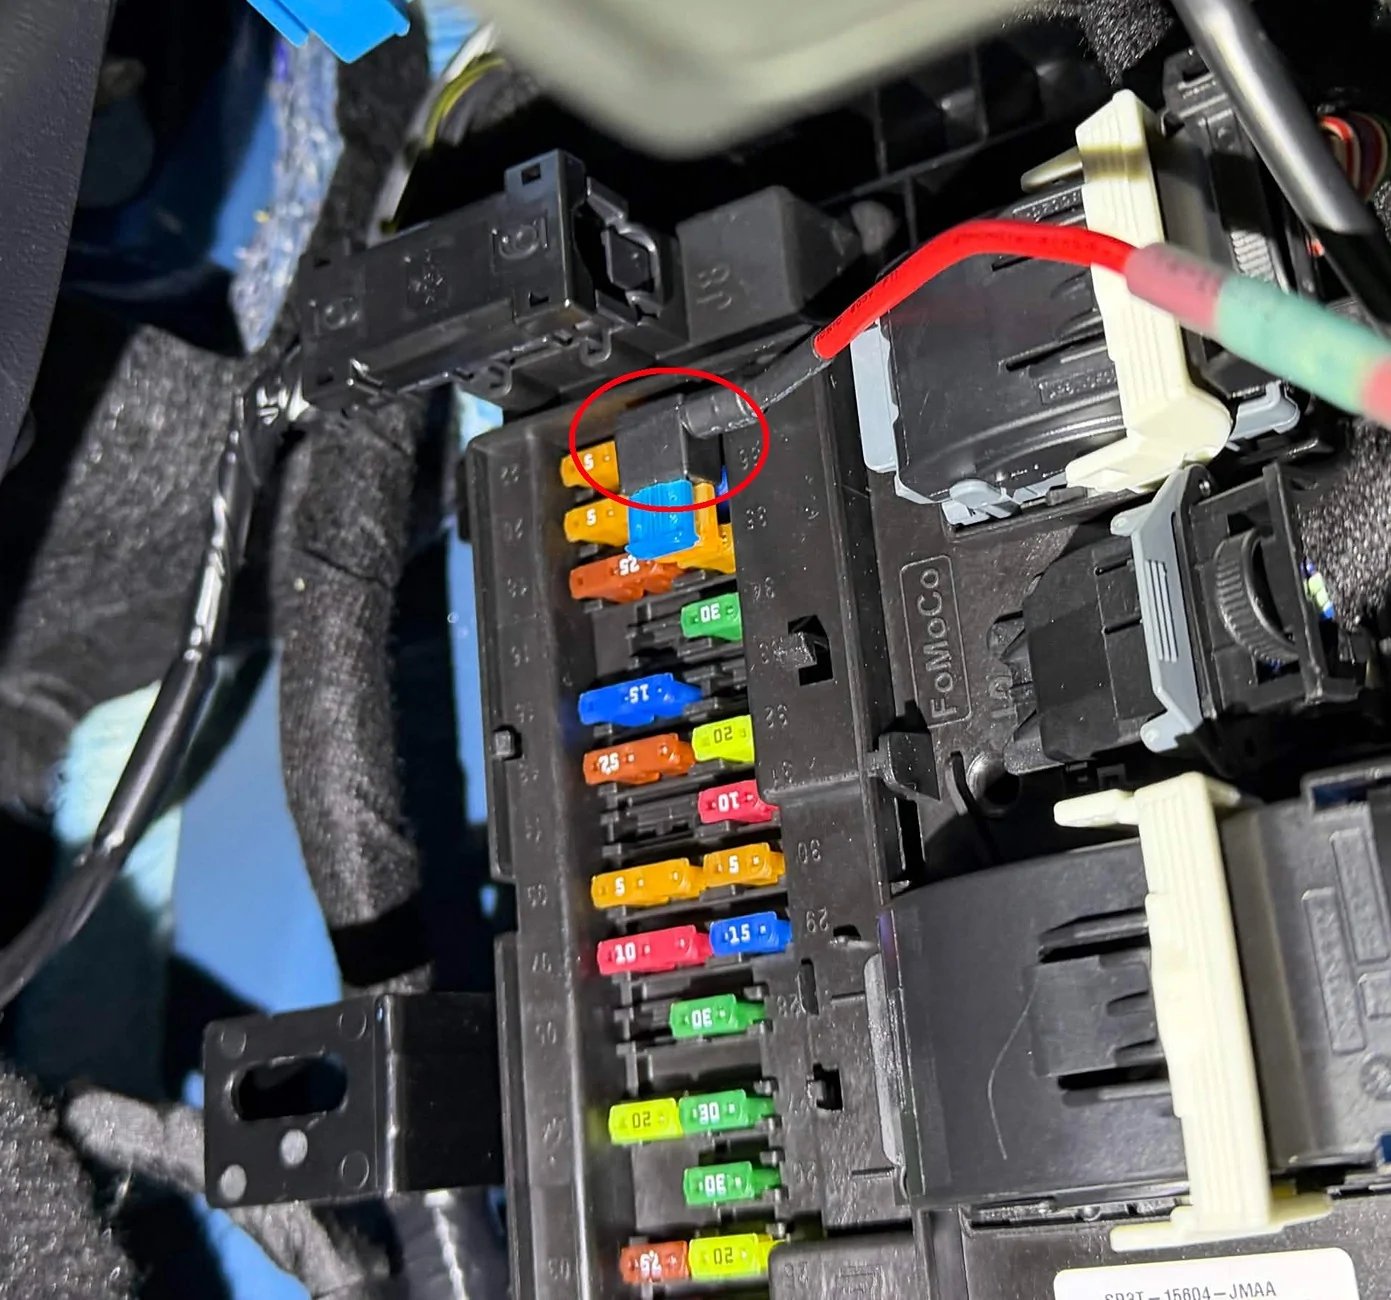
 Step 12: Remove fuse 37 from the BCM. This is the uppermost fuse in the right column. In its place, install the fuse tap with the output wire pointing right.
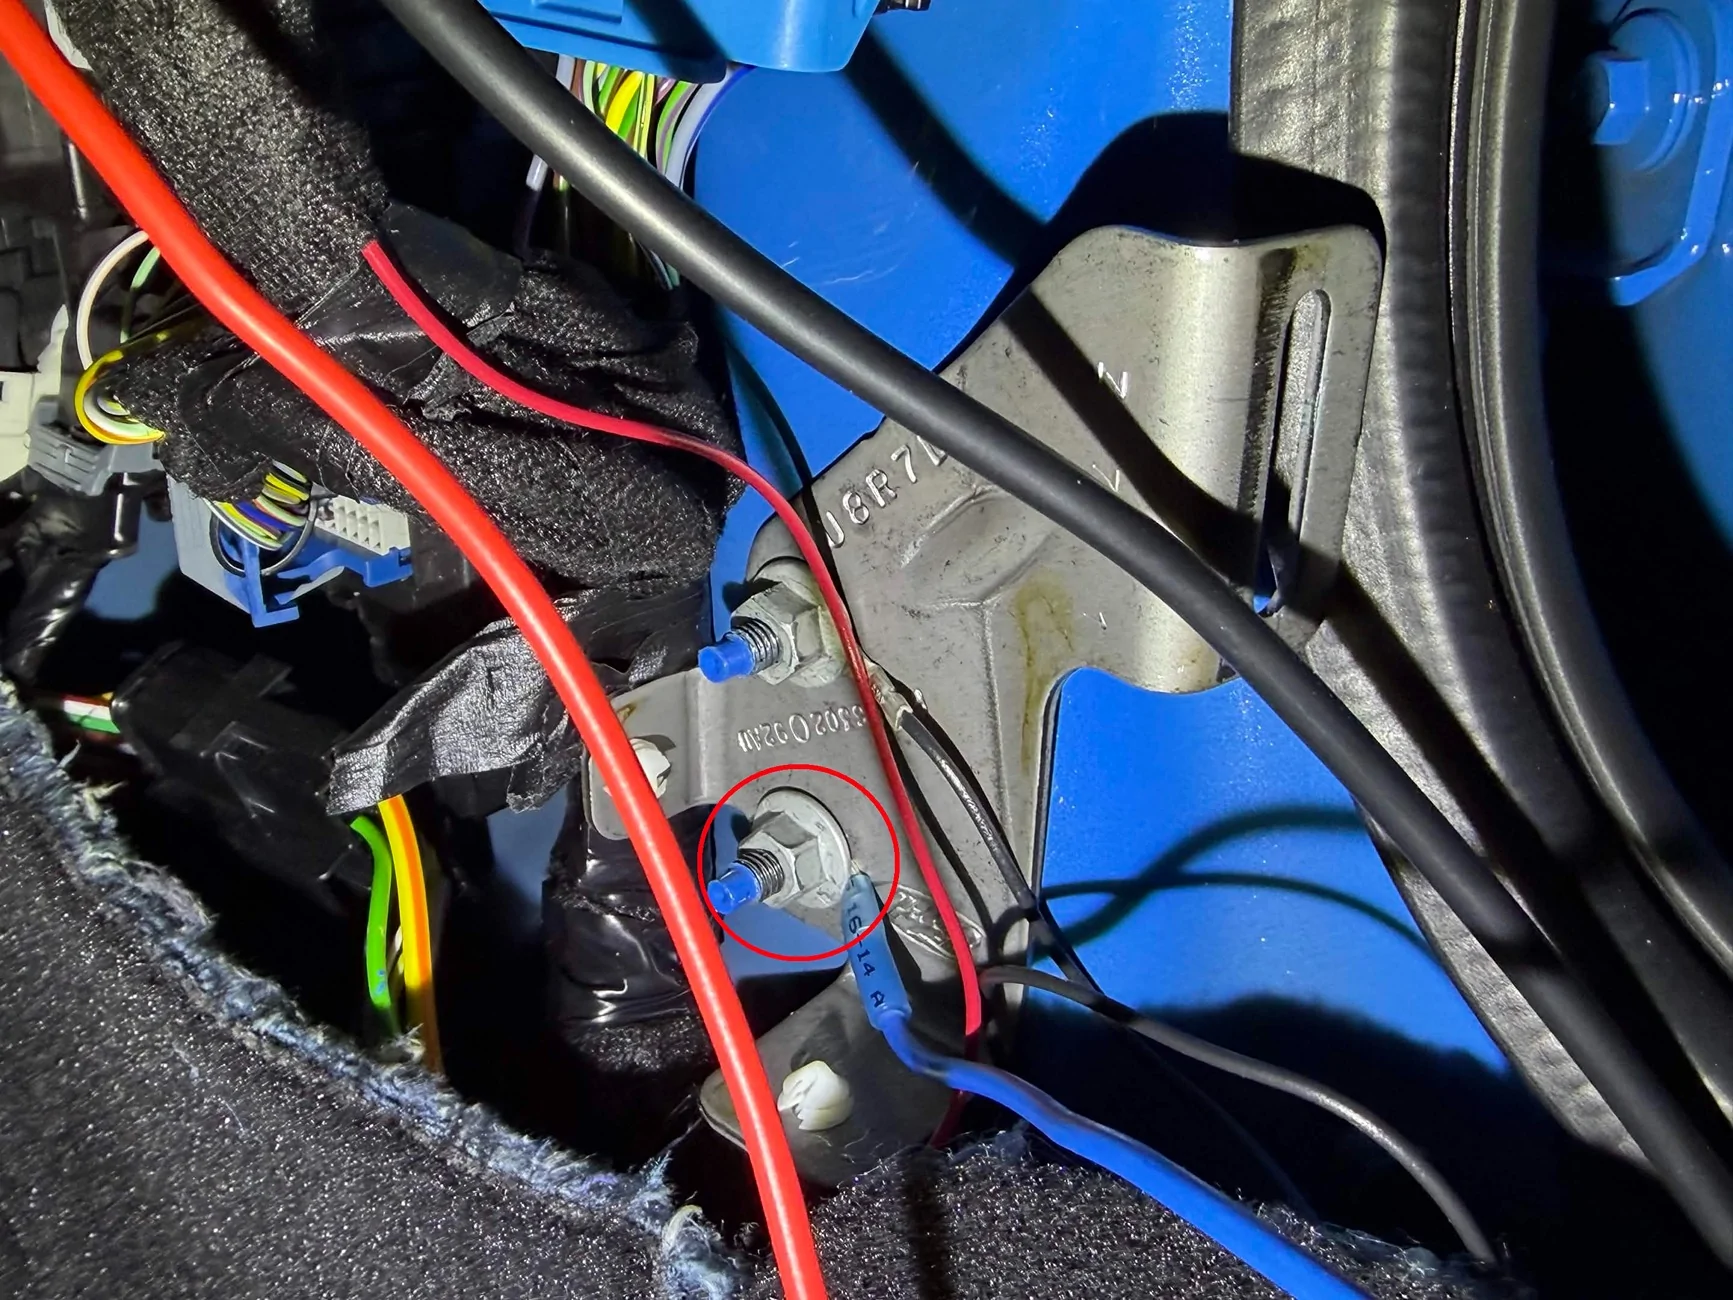
 Step 13: Use one of the studs for the footwell trim clip slots as your ground point. Remove the nut with a 10mm socket or wrench, then install the ring terminal of your new wiring harness over that stud and tighten it back down.
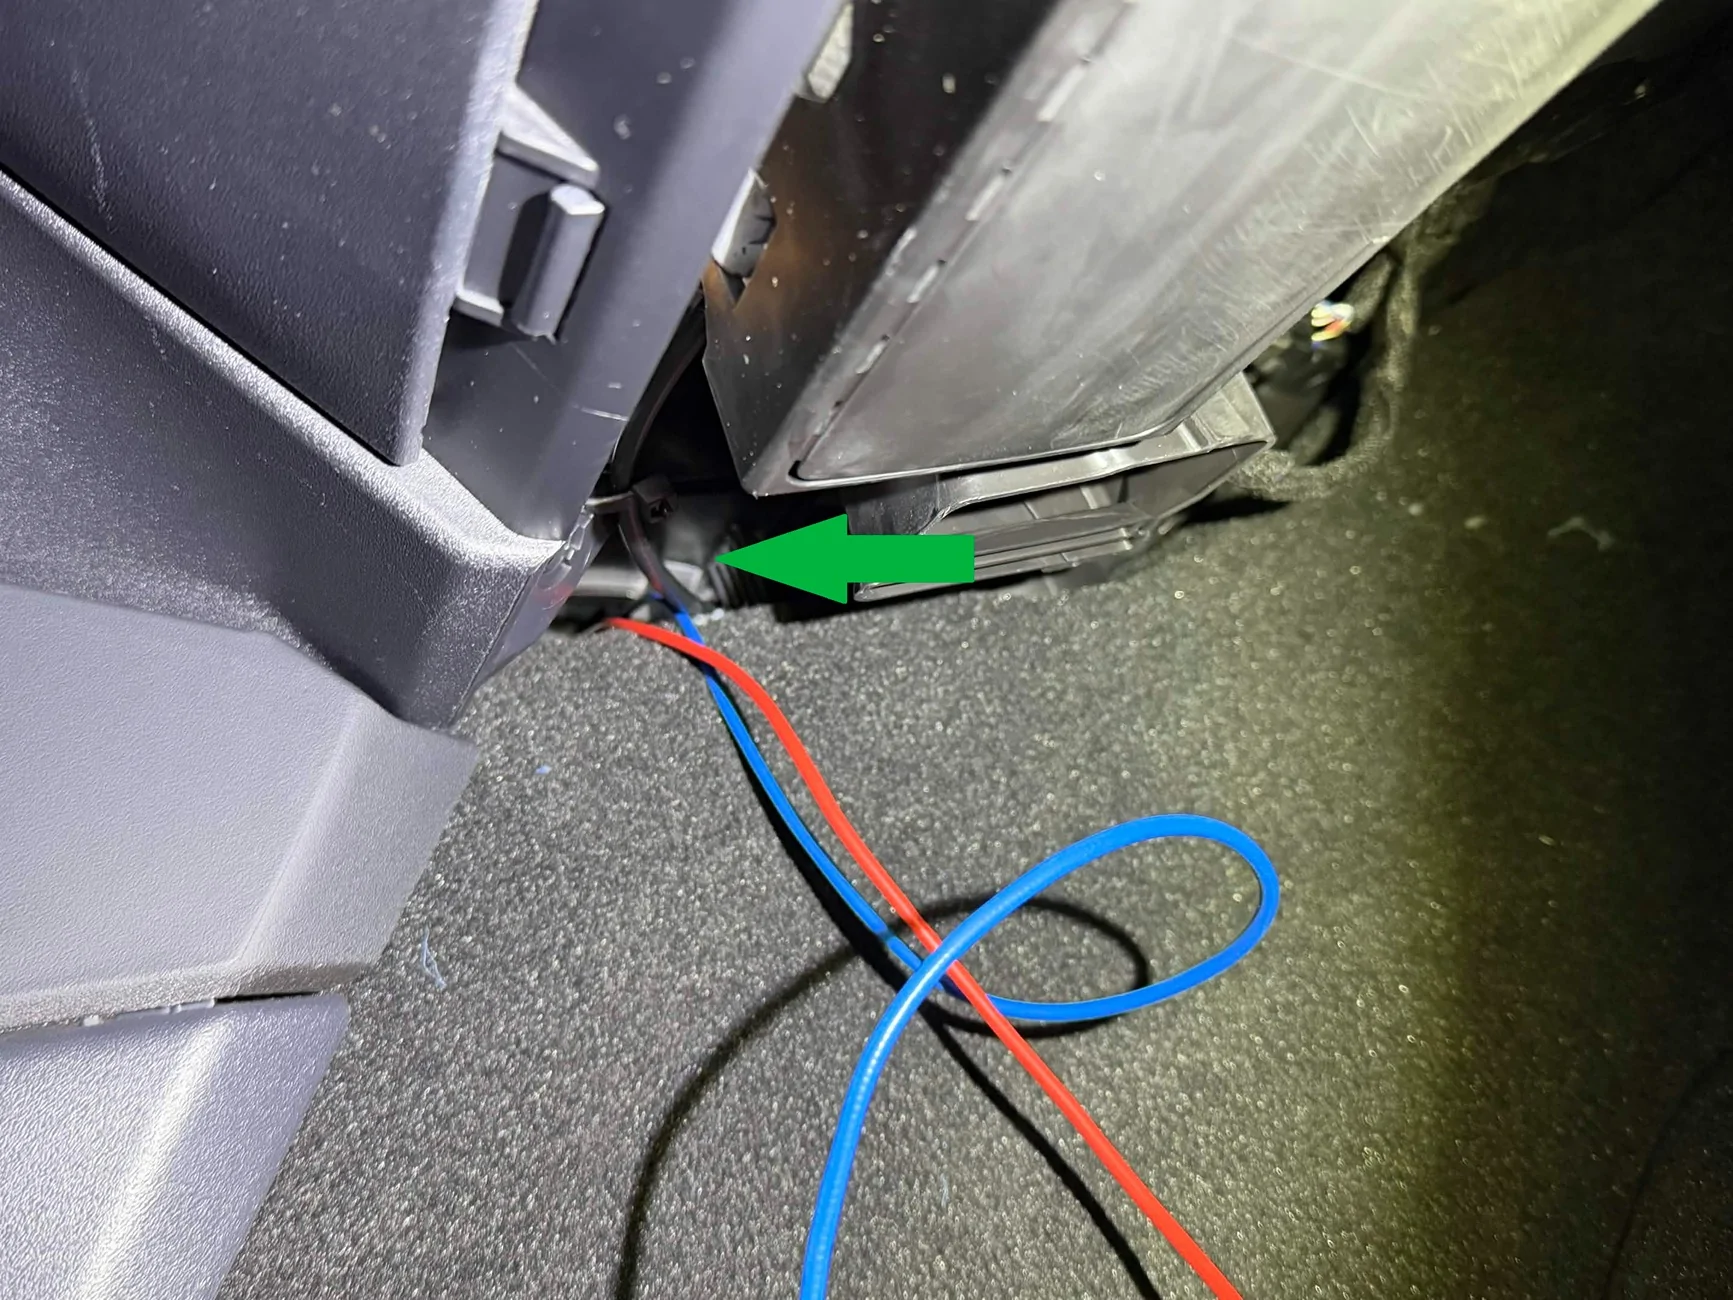
Step 14: There is a hole through the center console behind your cubby area/wireless charger that will allow you to run a wire from the passenger side footwell to the driver side. Feed the wiring assembly through it, and pull it out into the driver side footwell.
(You are done working behind your passenger side footwell trim and BCM cover at this point, although I would suggest waiting until you’ve verified that everything works before reinstalling all of the trim just to save yourself the trouble if you have to change anything.)
Step 15: Continue to feed the wire up and into the steering column, next to the existing steering column wiring harness.
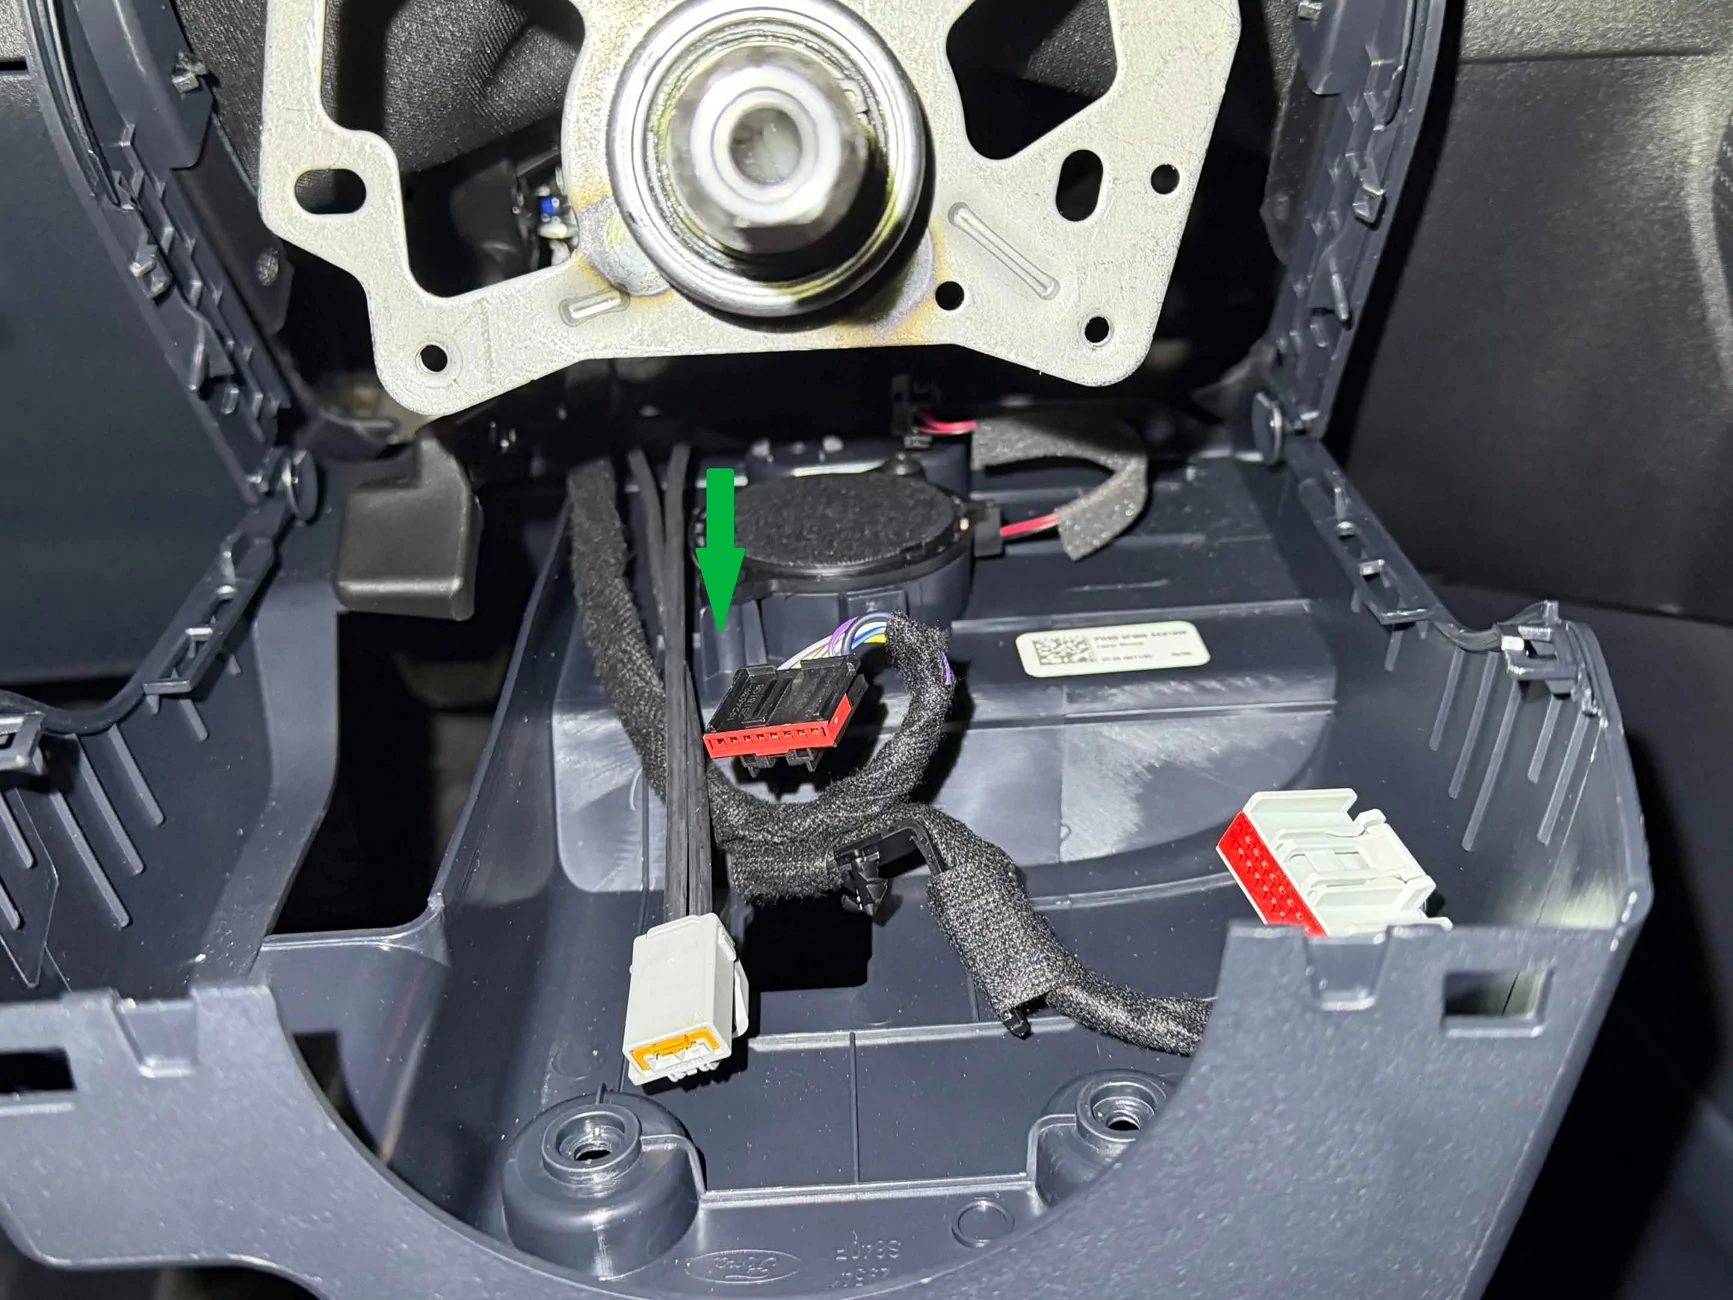
Step 16: Start installing your new SCCM/Clock spring/Stalks assembly. Plug your new custom wiring assembly into the back of the new SCCM. Plug the other two wires from the existing harness into the new SCCM and clock spring as well.
Step 17: Clip the new assembly to the face of the steering column.
Reinstall the Torx screws (35 in-lb). Reinstall the steering column trim.
Step 18: Remove the clock spring anti-rotation clip. Reinstall the steering wheel (41ft-lb with a new bolt). Make sure your original clock spring connector is connected, as well as the new heated steering wheel connector.
Reinstall the airbag. Make sure all three connectors on the airbag are fully installed and secured.
Step 19: Reconnect the battery and reinstall the battery cover.
Step 20: Connect to the car with FORScan. Flash your backed up SCCM as-built to the new SCCM.
Step 21: FORScan changes: Use the FORScan spreadsheet. For each option, compare your current value to the spreadsheet, then select a new value based on which value keeps all of your current values the same except for enabling the heated steering wheel.
APIM
Restart the car and ensure the heated steering wheel icon now appears in your HVAC controls.
Step 22: At this point, you should be done. Take the car on a test drive (the HSW won’t turn on unless the engine is running). Turn on the HSW – you should feel it start to heat up within a matter of 2-3 minutes. Go for a bit longer and try to smell for smoke, just to make sure your wire isn't burning up.
Step 23: After you verify that the HSW turns on and everything works, clean everything up. Reinstall your trim panels. Zip tie the wires down behind the glovebox and dash. Make it invisible to the passengers.
Step 24: Enjoy not having frozen fingers!
And that is all! Hope this helps anyone interested in this upgrade. Feel free to add any questions, comments, or suggestions!
Before we begin, though, I’d like to note that this upgrade will cost in the neighborhood of $650-$1300, depending on your source and condition for parts. There’s an argument to be made here that if you are looking for a new car and want the heated steering wheel, you should just consider getting the Premium to begin with, unless the heated steering wheel is the only premium feature you want (this is technically cheaper than upgrading to a Premium). However, if you’re like me and already have a base car, but found out after the fact that your fingers freeze off every morning with the cold leather wheel, this upgrade is a hell of a lot more cost effective than trading in for a Premium.
So, what’s actually involved?
The outline is:
- Replace the steering wheel with one with a heater
- Replace the clock spring and the steering column control module (SCCM) with the heated steering wheel (HSW)-specific one
- Wire the HSW-specific SCCM to the Body Control Module (BCM) with a DIY wiring assembly, bypassing the stock wiring harness
- Program the car with FORScan to accept the new SCCM and enable the HSW
Parts and tools
The parts you will need are:
- A steering wheel with a heater (obviously). You have several options for this:
- A take-off or salvage Premium or Dark Horse wheel
- The Dark Horse wheel upgrade kit from Ford ($405, not a bad value, and includes paddle shifters if you want to take this chance to upgrade your Ecoboost with paddles as well)
- An aftermarket wheel with a heater
Total cost: As low as $250-ish for a salvage wheel, up to $1000 for an aftermarket carbon fiber wheel if you wish.
- If you don’t get the Dark Horse upgrade kit, I would recommend you buy new steering wheel bolts, part number W721079-S437, only because Ford says they are not reusable. Now, I’m 90% sure these bolts are not Torque-to-yield and Ford only says they are not reusable because of the threadlocker, so you could reapply threadlocker and reuse the bolt if you wish, but, well, better safe than sorry. They’re cheap - $1-$5 and that’s for a packet of four. The Dark Horse steering wheel upgrade kit comes with a new bolt.
- The HSW-specific clock spring and SCCM. Technically, these are two different part numbers; however, the only way I have found to purchase the SCCM is through assembly number PR3Z-3F791-BA, which is the entire assembly behind the steering wheel. This includes the clock spring, as well as both steering column stalks preinstalled, which you may as well keep. Total cost: $294.
- Wiring pigtail 3U2Z-14S411-CAA. This is the connector that plugs into the back of the SCCM. Total cost: $50.
- ~6 ft each of red and black stranded 16AWG wire, or whatever colors you want to use for positive and negative. Let’s just call it $10.
- A Micro2 format fuse tap. These are cheap and you will likely get them in multi-packs. Let’s just call it $5.
- Micro2 format 10A and 5A fuses. Again, let’s call it $5.
- Some way to join wires. I used heat shrink insulated crimps, but you can also use normal insulated crimps, solder seal splices, Wagos, etc. Just make sure whatever you choose can safely take ~7A. Let’s call it $5 one more time.
- A ¼” ring terminal. Mine was included as part of the crimp kit that had my heat shrink insulated crimps.
The tools you will need are:
- 10mm wrench or socket (battery + ground studs)
- 7mm socket (preferably deep socket or socket + extension)
- 3-4mm Allen key (exact size doesn’t matter, this is for releasing the airbag clips)
- T50 Torx Plus bit (main steering wheel bolt)
- Some way to apply torque to your T50 TP bit to remove the steering wheel
- Torque wrench that fits your T50 TP bit, capable of 46 ft-lbs
- T25 (?) Torx Key (SCCM fastening screws). I would recommend an L-shaped Torx key over a Torx bit for this due to clearance issues
- Whatever you need for your preferred way to join wires – could be your fingers if you’re using Wagos, could be a crimper if you’re using crimps
- A FORScan-compatible scanner
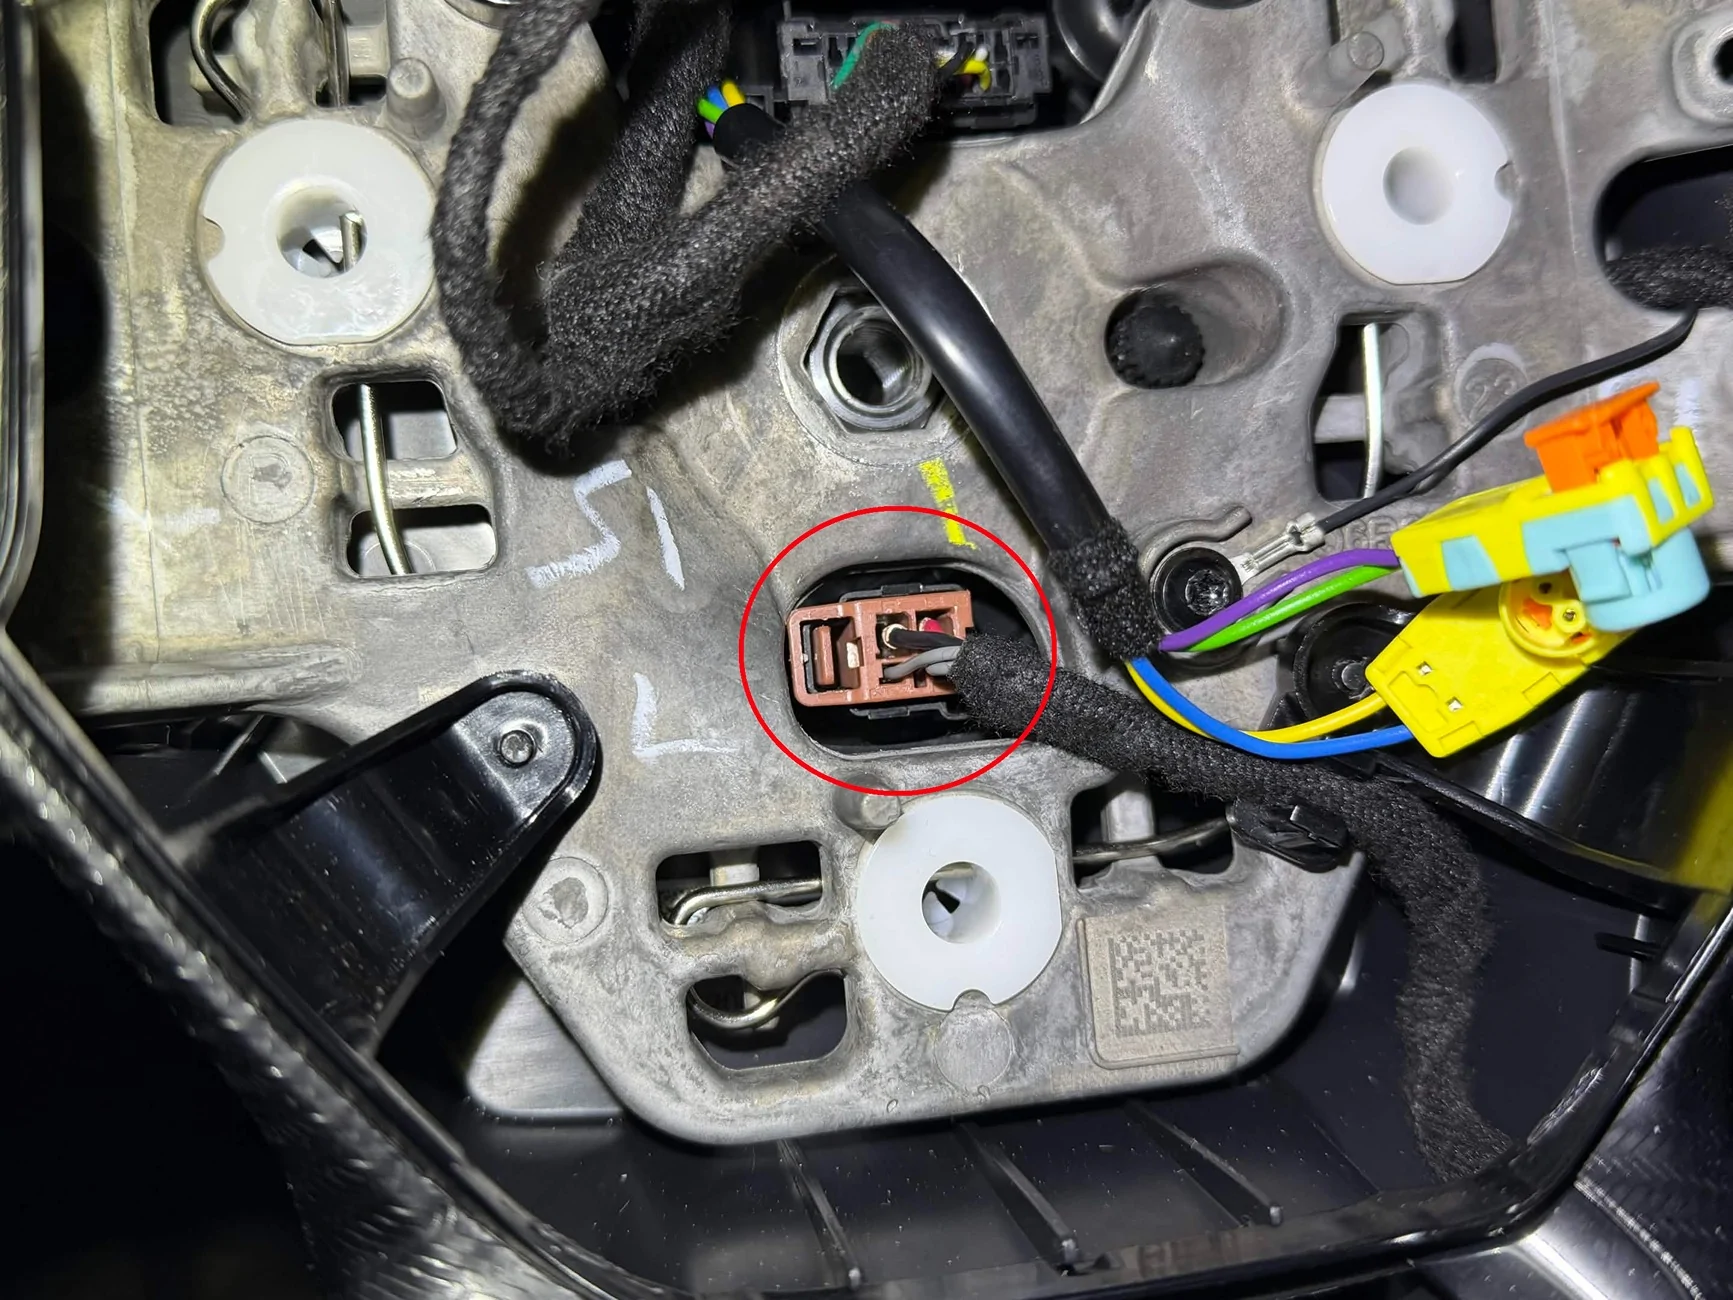
The electrical difference between a factory HSW-installed car and one without the HSW is that on cars with the HSW, the SCCM has an extra port on the back that is dedicated towards providing power for the HSW, and the wiring harness in the car has an extra branch and connector that plugs into this port (connector C226B). On non-HSW cars, the port on the SCCM is a dummy port, and the extra branch on the wiring harness is missing.
Luckily, the port is extremely simple: it is just a 12V input and a ground that needs to be powered when the ignition is on, so adding that connector just a matter of finding a 12V source that can supply about ~7A (the power of the heated steering wheel) that turns on with the ignition. Theoretically, you could tap in to any 12V supply that turns on and off with the ignition. However, the factory wiring option uses BCM fuse 37, which is what I chose to use.

Here is where it gets just a bit tricky again: fuse 37 on the BCM is a 20A fuse that powers either the auto-dimming rearview mirror alone, or the auto-dimming rearview mirror and the HSW together if the HSW is present. The output of fuse 37 comes out of BCM connector C2280A pin 16. If there is no HSW present, pin 16 is populated with a 22AWG wire powering the auto-dimming rearview mirror (as well as potentially another 20AWG wire powering “SYNC+”, though I haven’t confirmed that). If there is a HSW present, pin 16 is populated with an additional 18AWG wire powering the HSW; this wire is not present without the HSW.
That leaves us with several options for powering the heated steering wheel:

Luckily, the port is extremely simple: it is just a 12V input and a ground that needs to be powered when the ignition is on, so adding that connector just a matter of finding a 12V source that can supply about ~7A (the power of the heated steering wheel) that turns on with the ignition. Theoretically, you could tap in to any 12V supply that turns on and off with the ignition. However, the factory wiring option uses BCM fuse 37, which is what I chose to use.
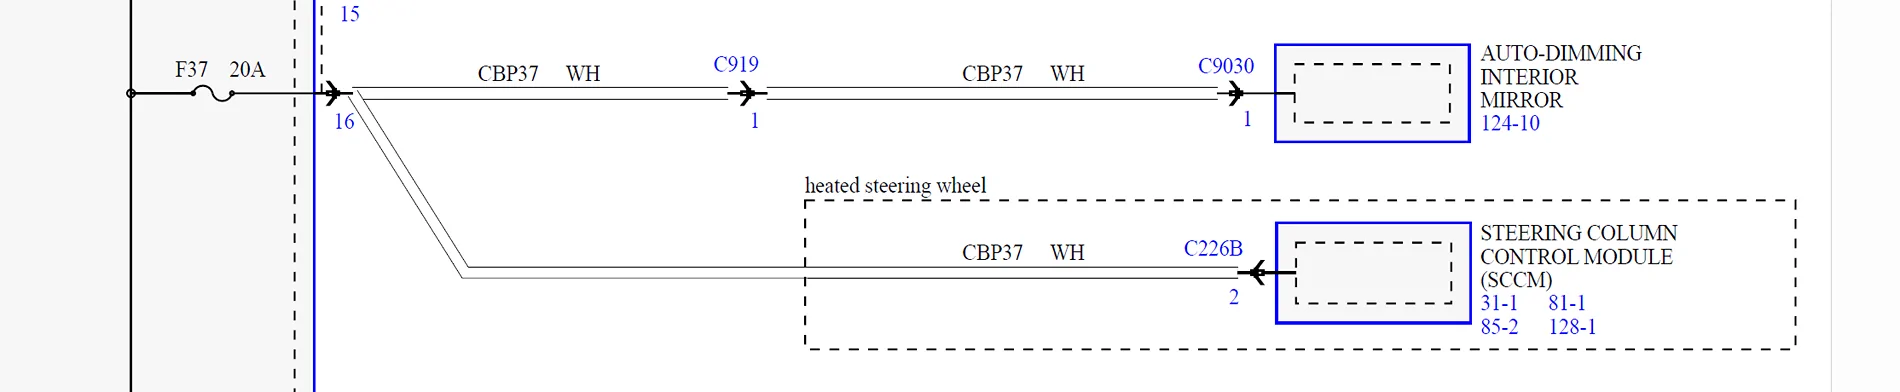
Here is where it gets just a bit tricky again: fuse 37 on the BCM is a 20A fuse that powers either the auto-dimming rearview mirror alone, or the auto-dimming rearview mirror and the HSW together if the HSW is present. The output of fuse 37 comes out of BCM connector C2280A pin 16. If there is no HSW present, pin 16 is populated with a 22AWG wire powering the auto-dimming rearview mirror (as well as potentially another 20AWG wire powering “SYNC+”, though I haven’t confirmed that). If there is a HSW present, pin 16 is populated with an additional 18AWG wire powering the HSW; this wire is not present without the HSW.
That leaves us with several options for powering the heated steering wheel:
- Use a wire tap to tap into the existing wires coming out of pin 16. Do not do this. This is electrically identical to the factory option and results in both the auto-dimming rearview mirror and the HSW being protected by fuse 37, which is the “right” fusing behavior – however, the problem is that the only existing wire coming out of pin 16 is a 22AWG wire, which will not safely support the 7A that the heated steering wheel needs. I’m mentioning this only to prevent you from trying this, because this you may set fire to your car.
- Depin pin 16 of connector 2280A, then repin it with the 22AWG for the mirror + the 18AWG for the HSW (+ the 20AWG for the SYNC+, if present) all going to that same pin. This is the most “factory-correct” option. However, I don’t even want to know what tools and parts would be needed to depin that connector, crimp a new pin, and reinstall it into the connector.
- Find a different 12V source that turns on with the ignition and power the HSW off of that. I didn’t go with this approach, but it is absolutely possible.
- Replace fuse 37 with one of these weird fuse extension things and tap the load side of its wire. Much safer than option #1, because these already use 16AWG wires and can support the 7A needed. The benefit of this is that it retains the same protection logic as factory, i.e. both the mirror and the HSW are protected by the same fuse. However, when I tried this, the extension I got didn’t inspire the most confidence in how securely it plugged into the BCM, so I ended up ditching this approach out of an abundance of caution. If you can find better extensions, it’s worth exploring.
- Use a fuse tap, and power the HSW off of the extra circuit and fuse that a fuse tap gives you. The upside of this approach is that it puts the HSW and the mirror on separate fuses, which means you can, say, power the HSW off of a 10A fuse and the mirror off of a 5A fuse. This is actually safer for the mirror, because with a 22AWG wire, the original 20A fuse would not blow before the wire itself may be damaged. With a smaller 5A fuse protecting the mirror instead, you can now blow the fuse for the mirror independently at a much lower current and protect that 22AWG wire, while not blowing the fuse for the 16-18AWG wire for the HSW. The downside is that it slightly changes the failure behavior for the BCM: factory failure logic is that if fuse 37 blows, both the mirror and the HSW are taken out. Now, however, you can blow one without affecting the other, which means the BCM may no longer read that failure correctly and may not throw the right codes or even fail to throw a code outright if any failure happens.
Let’s get in to the actual upgrade.
Installing the Heated Steering Wheel
Step 1: Before doing any hardware work, use FORScan to back up your as-built data for the SCCM. This is not a “just in case” step! You will need the as-built data to flash to your new SCCM later.
Step 2: Make your wiring assembly using the pigtail, some 16AWG wire, the fuse tap, and the ring terminal. The connector pinout is as follows:

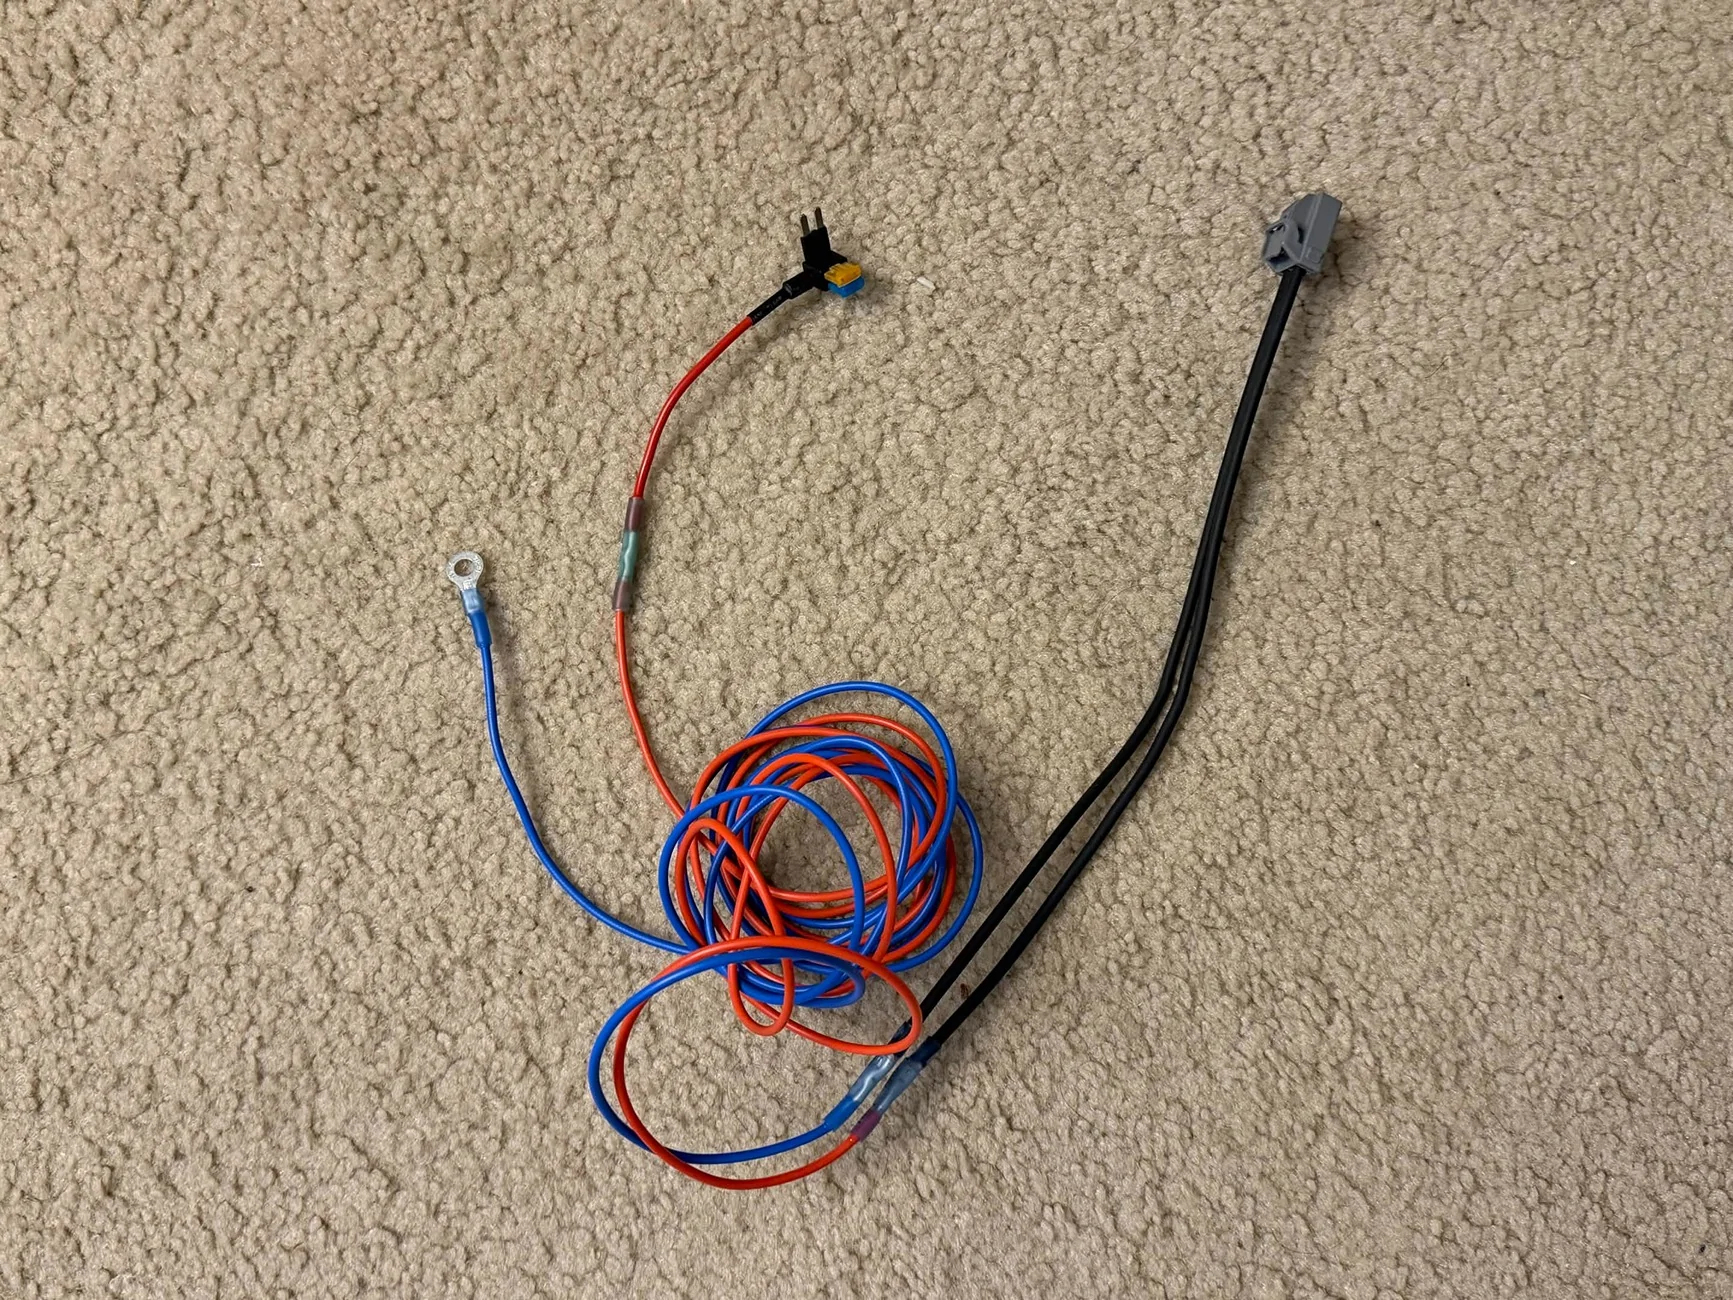
My hardware store was out of black wire, so I got blue instead.
Use a 10A fuse in the upper slot of the fuse tap, and a 5A fuse in the lower slot. The upper slot will power the ~7A heated steering wheel. The lower slot will power the mirror.
Step 3: Remove the battery cover. Disconnect the negative terminal of your car battery. You don’t want to be working on live airbags. Wait 2-10 minutes for the car to discharge, depending on how paranoid you are.
Step 4: Release the airbag and remove the steering wheel (T50 Torx Plus). There are videos online about how to do this.
Note that most tutorials online seem to use standard Torx bits for the steering wheel bolt, possibly because whoever made them was not aware of the difference between Torx and Torx Plus. I do not recommend this. While Torx bits work in Torx Plus fasteners in a pinch, they are not as secure, and you run a greater risk of mangling the bolt head - especially at the torque levels involved here. I would recommend getting a proper T50 Torx Plus bit, even if it is harder to find.
What you should be left with after you remove the steering wheel.
Step 5: Transfer all of your steering wheel controls and the airbag clips over to the new steering wheel. There are videos online about how to do this. Do not reinstall your steering wheel yet.
Step 6: Pull your steering column all the way out, and raise it to the highest position.
This needs to be done to access the third lower trim screw, but I would recommend keeping it here throughout the entire install. You want the steering column all the way out when you install and tie down the new wire to ensure you have sufficient wire length to retain all adjustability of your steering column.
Step 7: Unclip and release the steering column trim and let it hang free. The upper trim should unclip and release fairly easily by hand. The lower trim will require you to remove three screws from under the steering column using a 7mm socket. The last screw in the very back is the one where a deep socket or an extension is helpful.
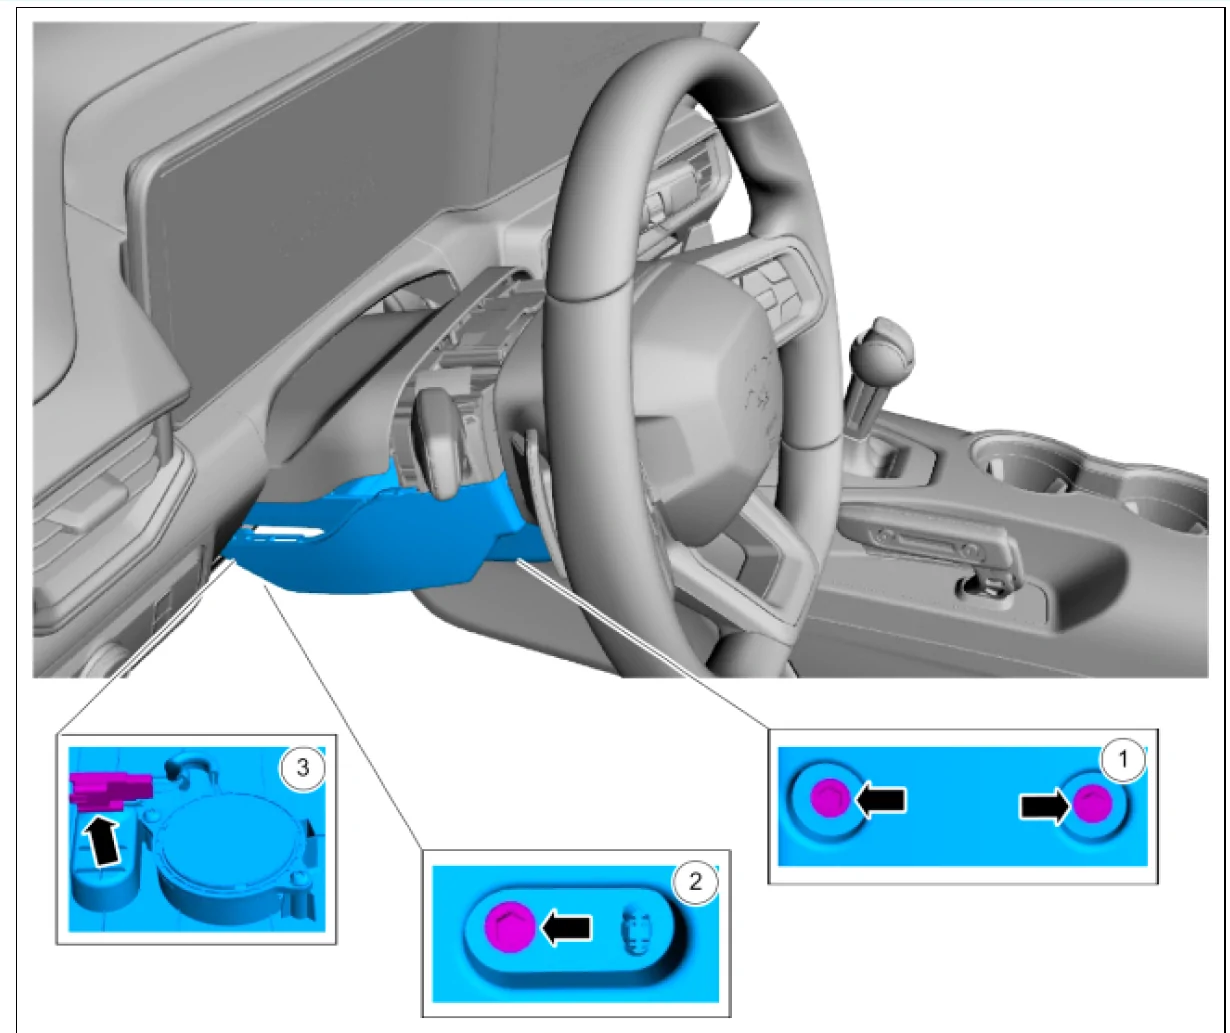
Ignore box 3, that is the connector for the steering column speaker. It is not necessary to disconnect it unless you want to remove the trim panel altogether, which we won't need to do.
Step 8: Remove the 4 T25 screws holding the steering column electronics assembly to the steering column.
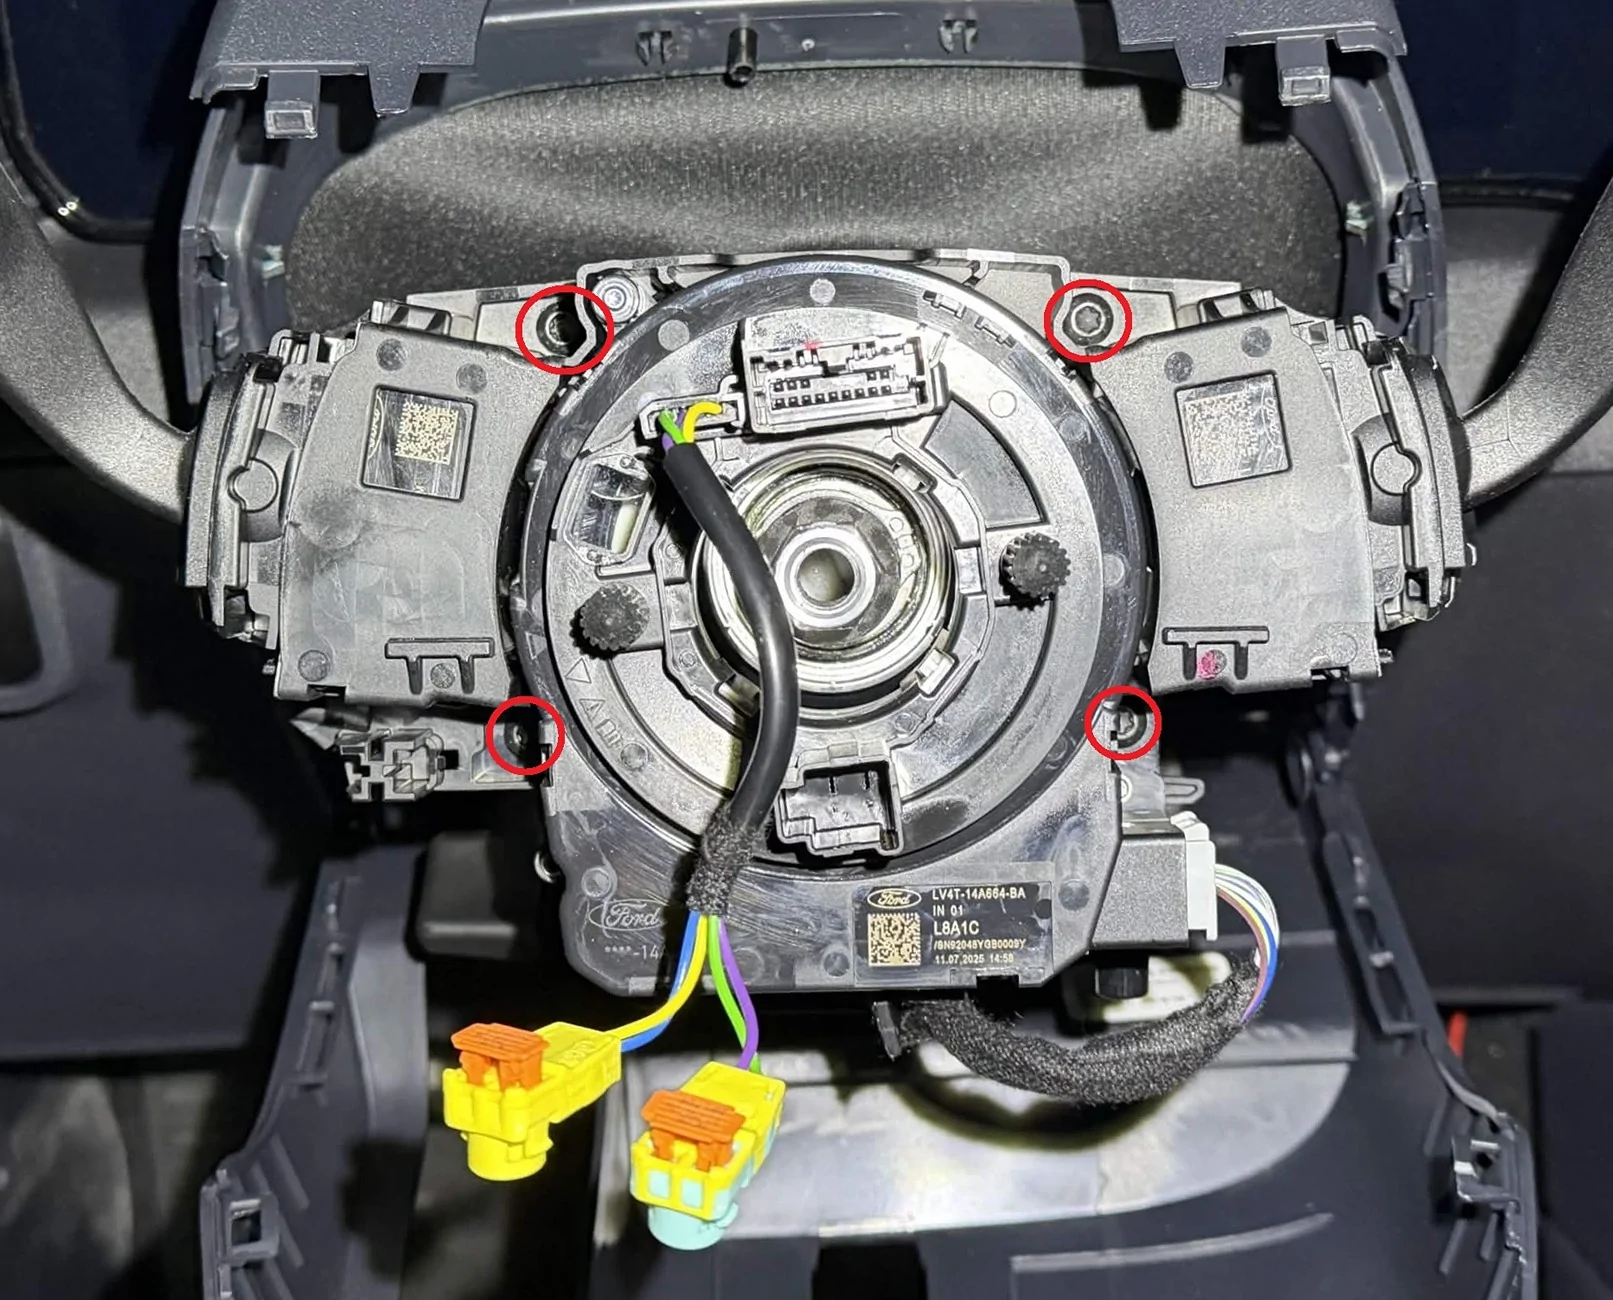
After that, the assembly will still be retained to the steering column by four clips. Unclip and remove the steering column electronics assembly.
Step 9: Start working on the passenger side. Remove the BCM cover in the passenger side footwell (the BCM cover comes out when you pull out to unclip, then slide up to release it from the passenger side footwell trim).
Step 10: Loosen or remove the passenger side door sill trim. This should come out fairly easy with a firm yank upwards, just be careful of how it goes together with the weather seal.
Step 11: Remove the passenger side footwell trim. Again, this should come out fairly easily with a firm yank towards the back of the car.
Step 14: There is a hole through the center console behind your cubby area/wireless charger that will allow you to run a wire from the passenger side footwell to the driver side. Feed the wiring assembly through it, and pull it out into the driver side footwell.

(You are done working behind your passenger side footwell trim and BCM cover at this point, although I would suggest waiting until you’ve verified that everything works before reinstalling all of the trim just to save yourself the trouble if you have to change anything.)
Step 15: Continue to feed the wire up and into the steering column, next to the existing steering column wiring harness.
Step 17: Clip the new assembly to the face of the steering column.
Step 18: Remove the clock spring anti-rotation clip. Reinstall the steering wheel (41ft-lb with a new bolt). Make sure your original clock spring connector is connected, as well as the new heated steering wheel connector.
Step 19: Reconnect the battery and reinstall the battery cover.
Step 20: Connect to the car with FORScan. Flash your backed up SCCM as-built to the new SCCM.
Step 21: FORScan changes: Use the FORScan spreadsheet. For each option, compare your current value to the spreadsheet, then select a new value based on which value keeps all of your current values the same except for enabling the heated steering wheel.
APIM
- 7D0-02-01 xxxx-*xxx-xx -> HSW Available
- 7D0-02-02 x*xx-xxxx-xx -> CAHSW Enabled
- 733-01-04 xxxx-xxxx-*x -> HSW Vehicle DOES have a HSW
- 720-02-02 xxxx-x*-> RSSW Enabled
- Note that this appears to be the option to turn on the heated steering wheel during remote starts, but for whatever reason, this option needs to be turned on for the heated steering wheel control to appear even in vehicles without remote start. My manual GT did not have the HSW icon show up in the HVAC controls until this was turned on.
- 720-05-02 *xxx-xx -> HSW Enabled
Restart the car and ensure the heated steering wheel icon now appears in your HVAC controls.
Step 22: At this point, you should be done. Take the car on a test drive (the HSW won’t turn on unless the engine is running). Turn on the HSW – you should feel it start to heat up within a matter of 2-3 minutes. Go for a bit longer and try to smell for smoke, just to make sure your wire isn't burning up.
Step 23: After you verify that the HSW turns on and everything works, clean everything up. Reinstall your trim panels. Zip tie the wires down behind the glovebox and dash. Make it invisible to the passengers.
Step 24: Enjoy not having frozen fingers!
And that is all! Hope this helps anyone interested in this upgrade. Feel free to add any questions, comments, or suggestions!
Sponsored
Last edited:
 can you expand on getting access to ford service docs ? This may help me with my future projects
