5.0ALM
Well-Known Member
- Joined
- Oct 31, 2022
- Threads
- 98
- Messages
- 1,277
- Reaction score
- 2,141
- Location
- Brisbane, Australia
- Vehicle(s)
- 2016 RAV4 Cruiser, 2024.50 Mustang GT Fastback
- Thread starter
- #1
I posted this a week or so ago in my own "What's in ALM's garage thread" for the local Aussies that follow me, but thought it may be worth a topic of it's own, as those in other markets might consider implementing something similar.
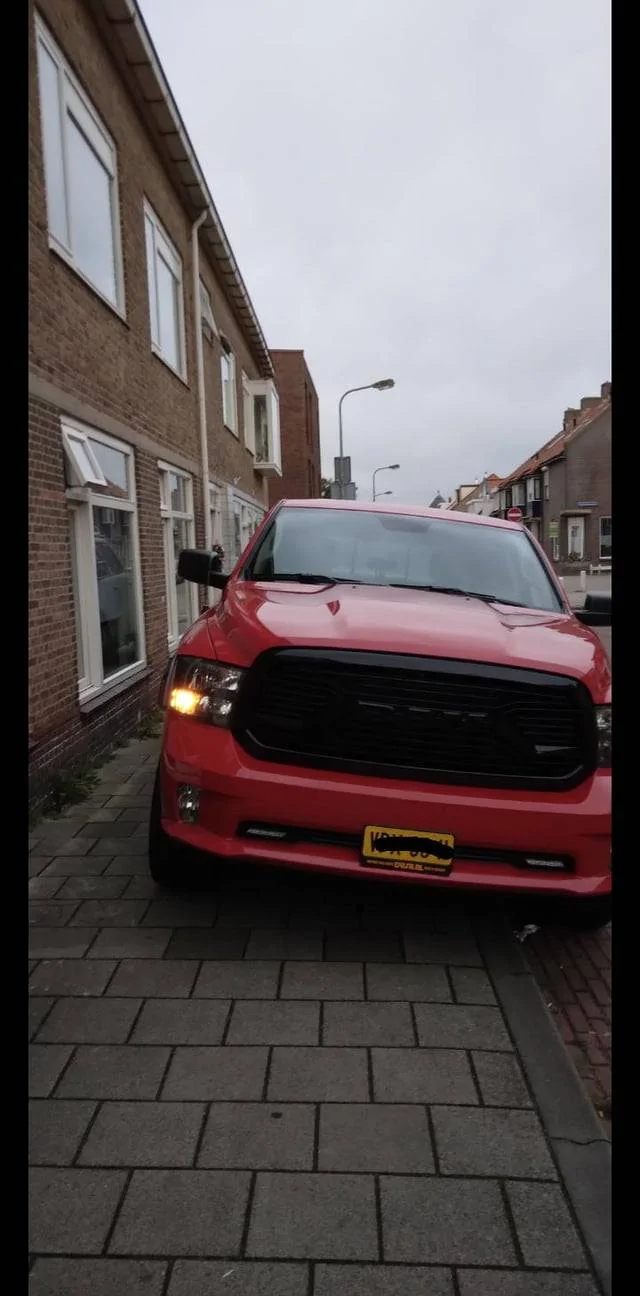
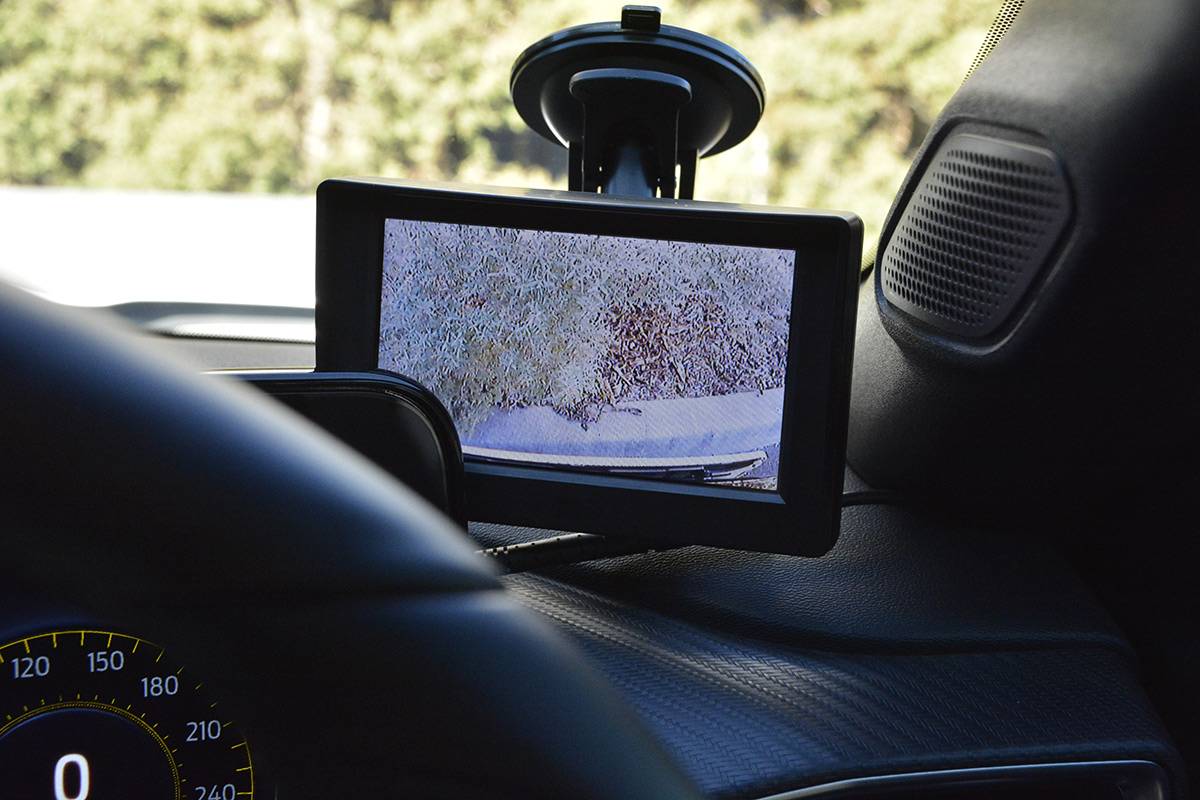
Front Parking Camera
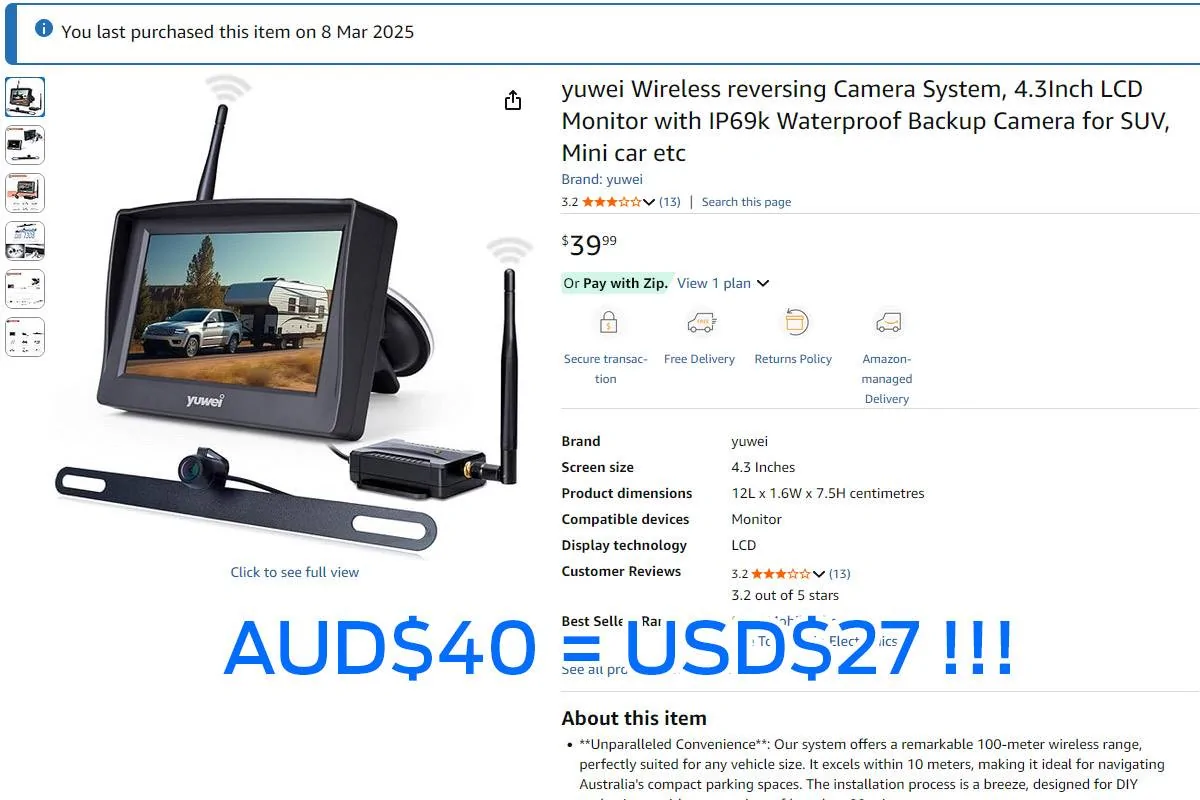
I'm using a wireless reverse camera system as a front camera.
Wireless means there are no hassles getting cable through the firewall.
The camera system itself is inexpensive and works well, but some custom brackets had to be knocked up.
This was easy, using some scrap aluminium pieces that were on hand, and basic handy man tools.
Amazon - Wireless reversing camera kit - affiliate link (I may earn a small commission at no extra cost to you)
https://amzn.to/4kFyzIR

It was AUD$50 (USD$33) when I purchased it back in March 2025, but is AUD$40 at the time of writing.
The following Aussie store links are provided to show the items I used, but look for alternatives local to you.
Autobarn - Looming Tape
https://autobarn.com.au/ab/Autobarn...r-Builders-Underbody-Tape-19mm---UBT/p/142430
Autobarn - M6 Flange Head Bolts
https://autobarn.com.au/ab/Autobarn...-Flange-Head-Bolt-M6-x-16mm---FBM21/p/SP76970
Super Cheap Auto - Gloss Black Enamel Spray Paint
https://www.supercheapauto.com.au/p/polycraft-polycraft-metal-cover-gloss-black-300g/683480.html
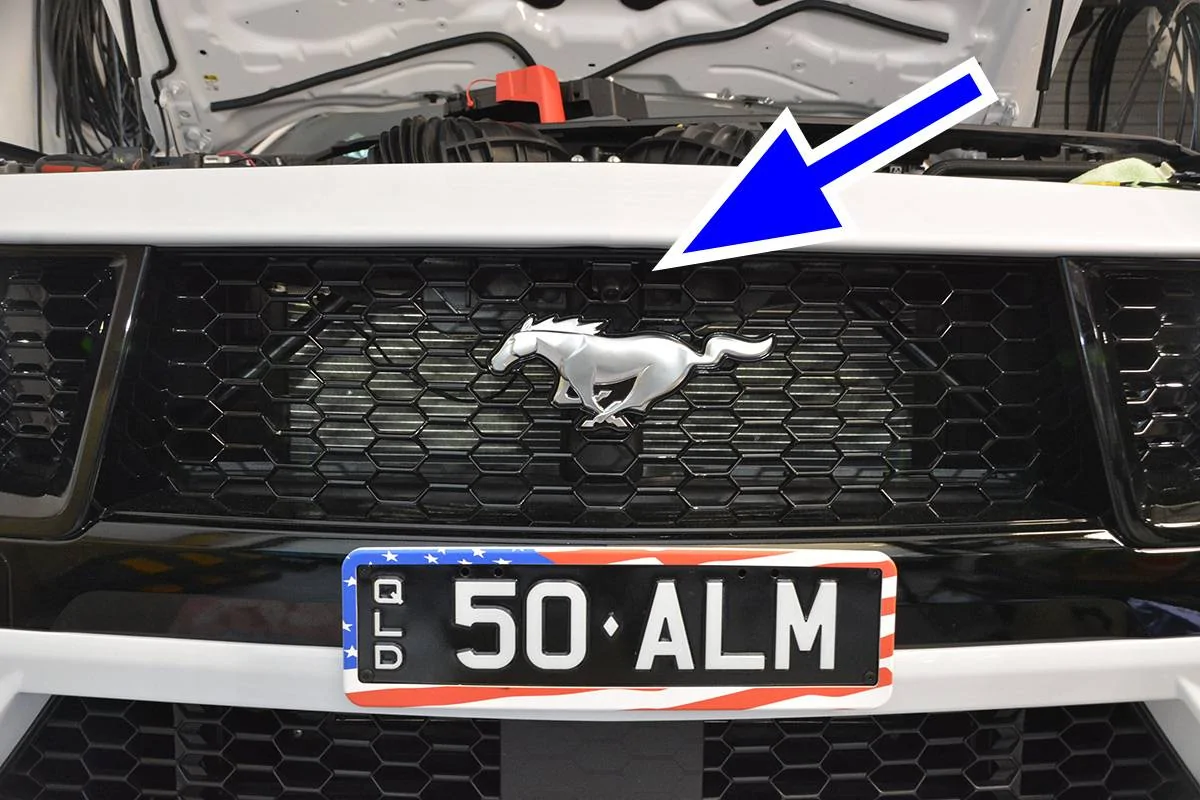
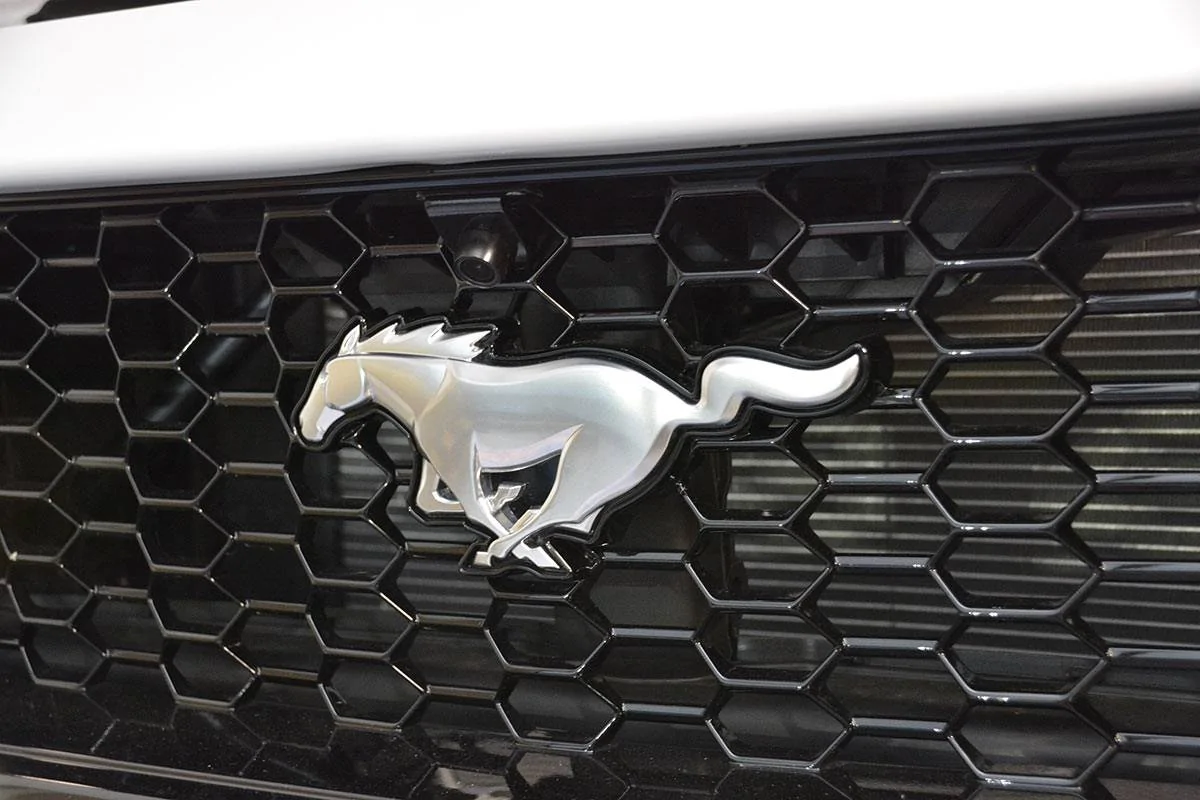
See the camera?
The camera mounted to the home-brew camera mount, sprayed in gloss black enamel.
I think my mount blends in quite well, considering.
It could have been finessed more, but I just wanted to get it done.
It's held in place with 3M VHB double-sided tape.
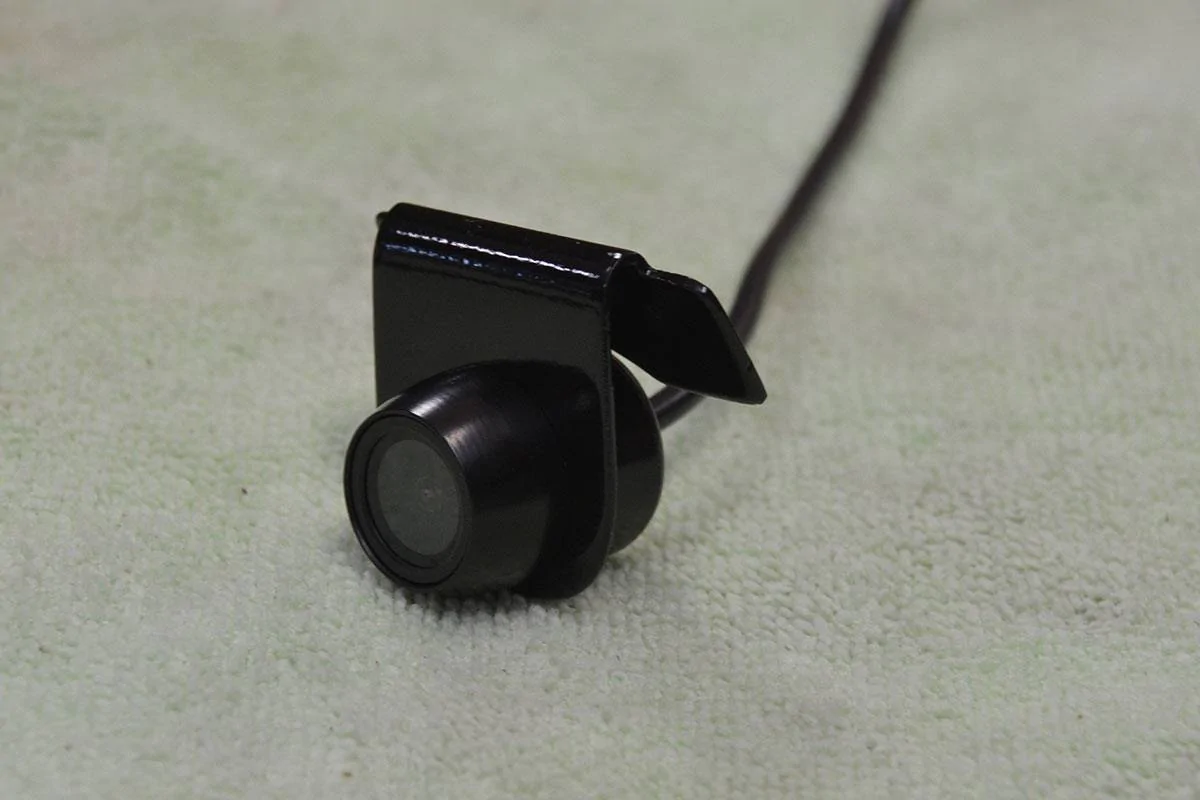
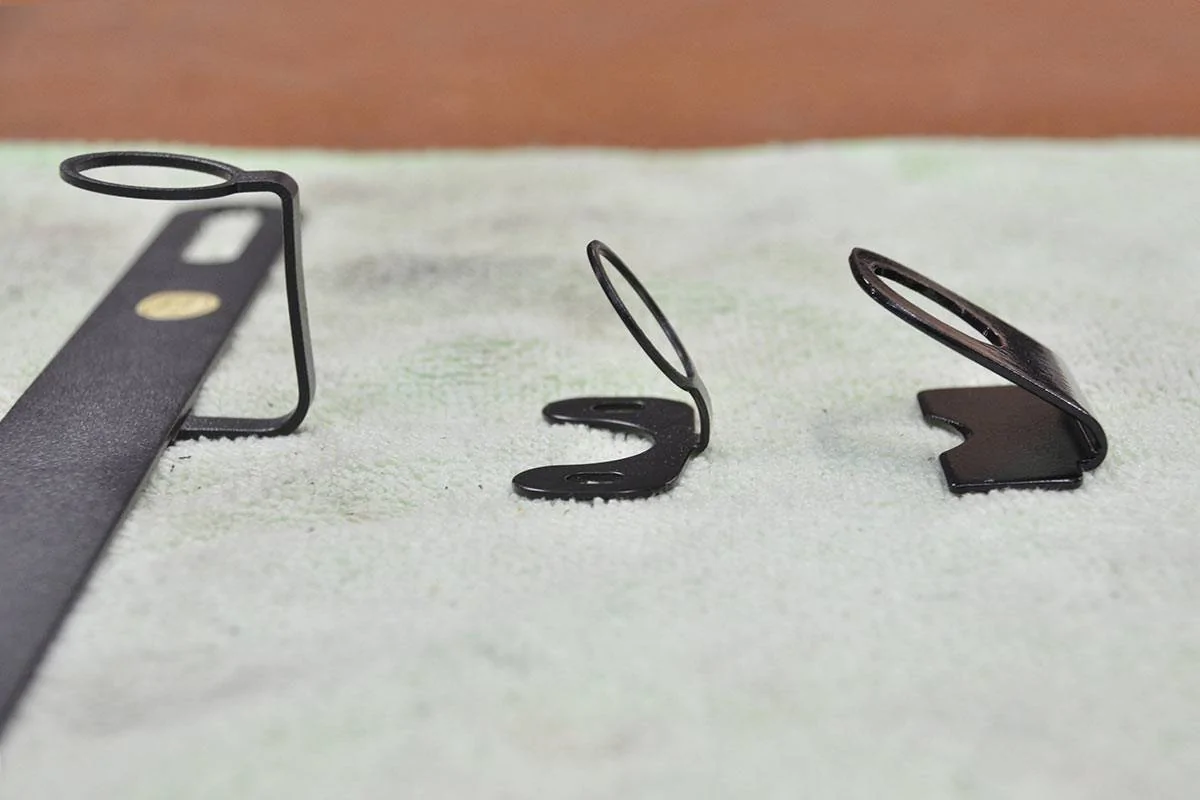
This provides a good comparison between the supplied number plate bracket, their butterfly bracket, and my own home-brew butterfly mount.
You can see the extra down tilt required to get the result I achieved.
Corners could be cut if you can use the supplied brackets, but it's worth the effort making your own and getting it just right.
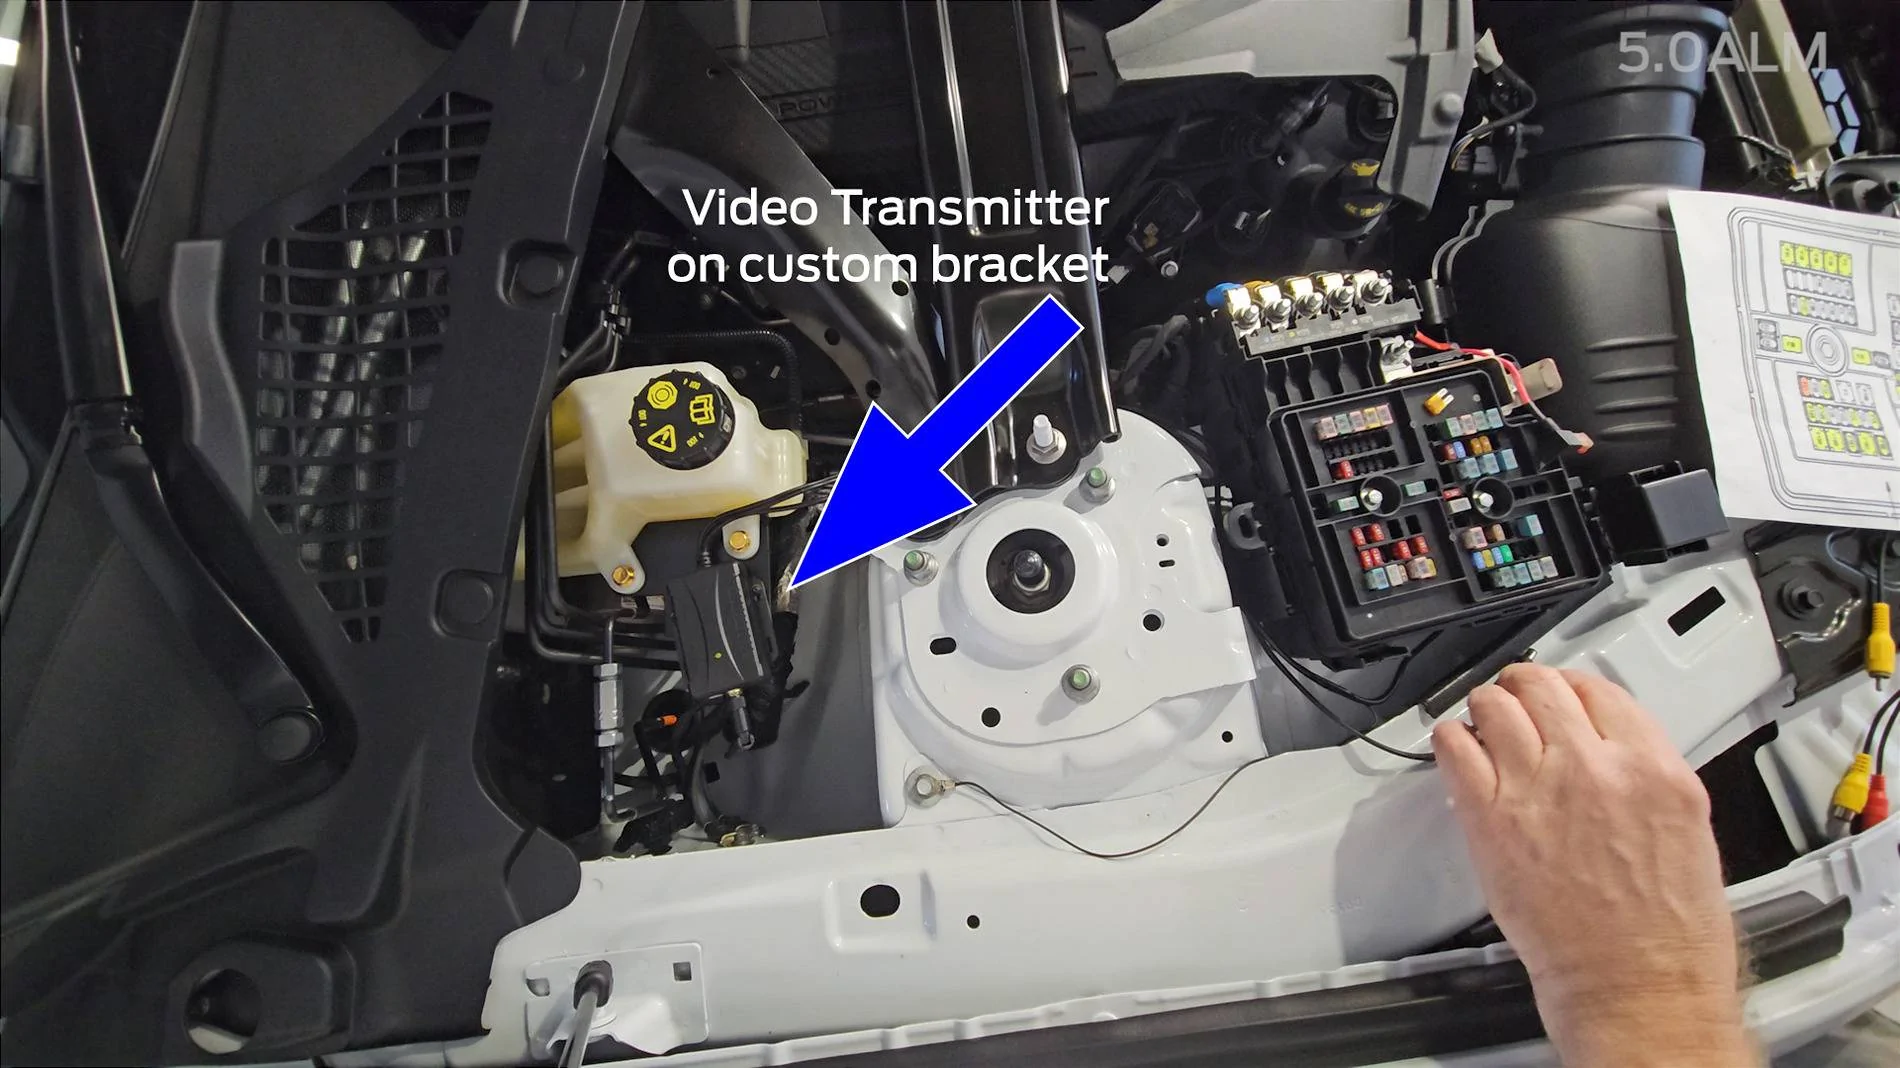
A wireless system eliminates any hassles trying to pass cables through the firewall.

I think the battery is located here on LHD vehicles, so you'd need to mirror this or find an alternative spot.
It is handy having the fuse box nearby to power the camera and transmitter though.
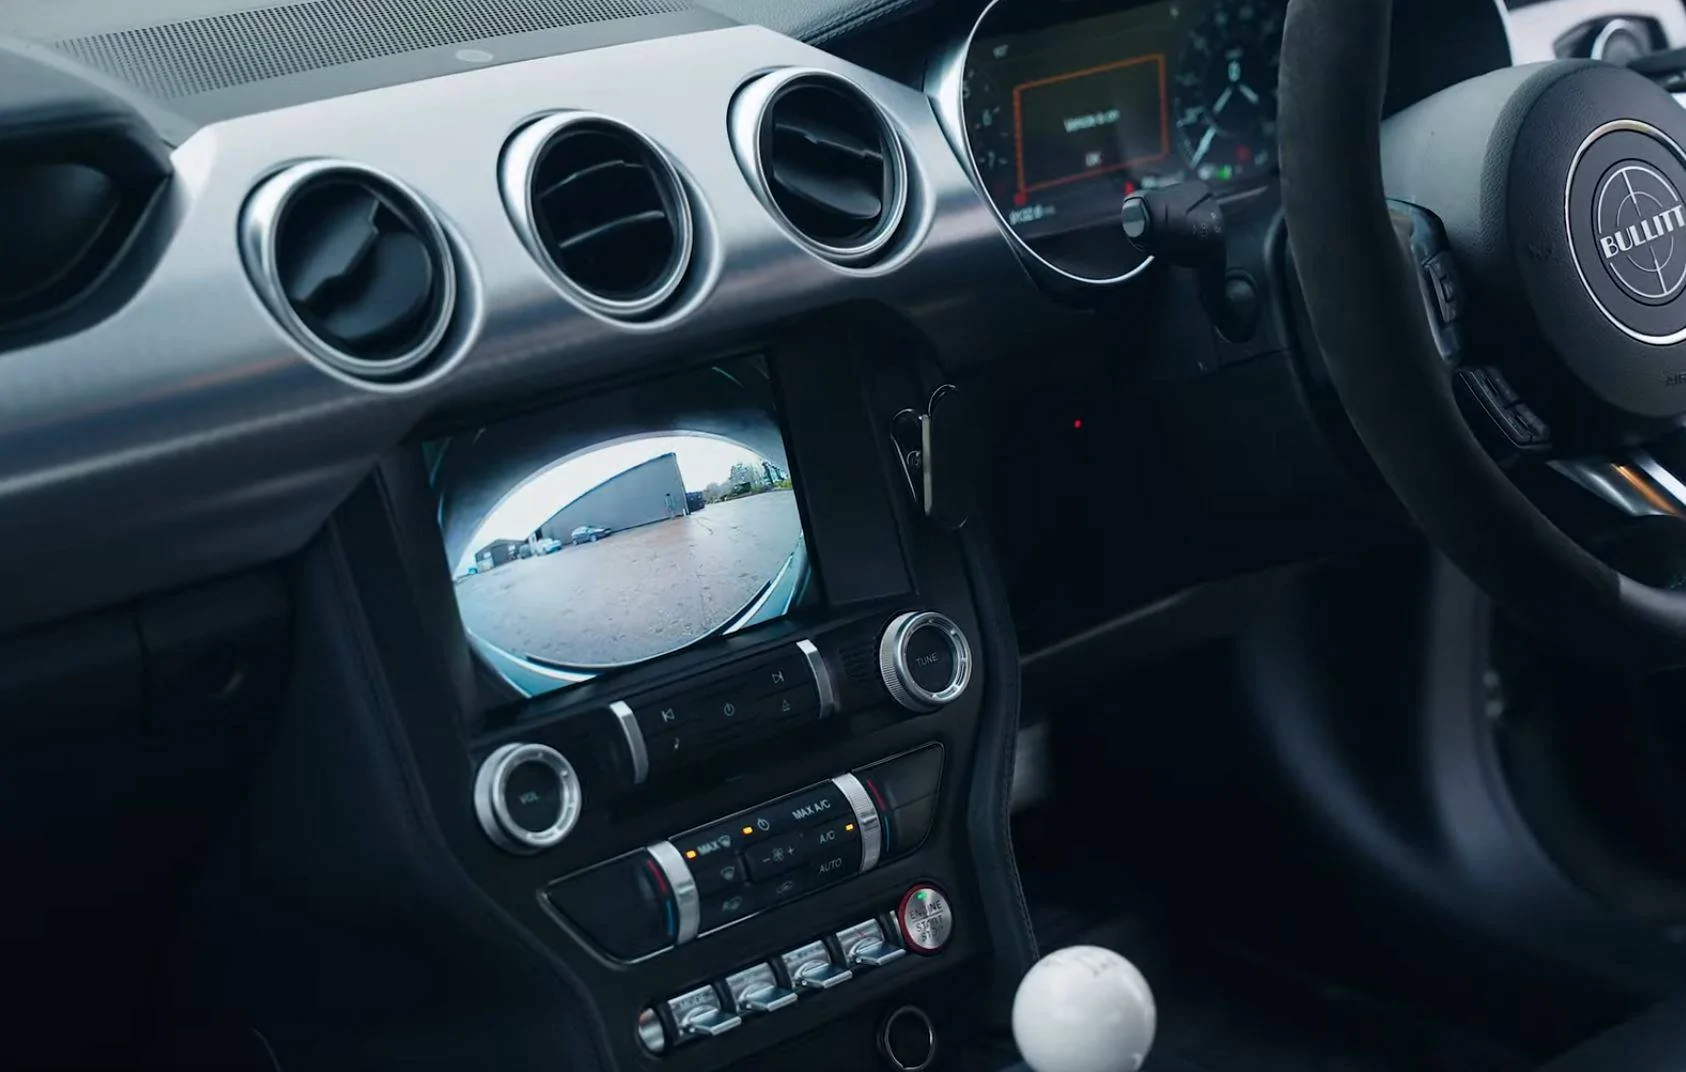
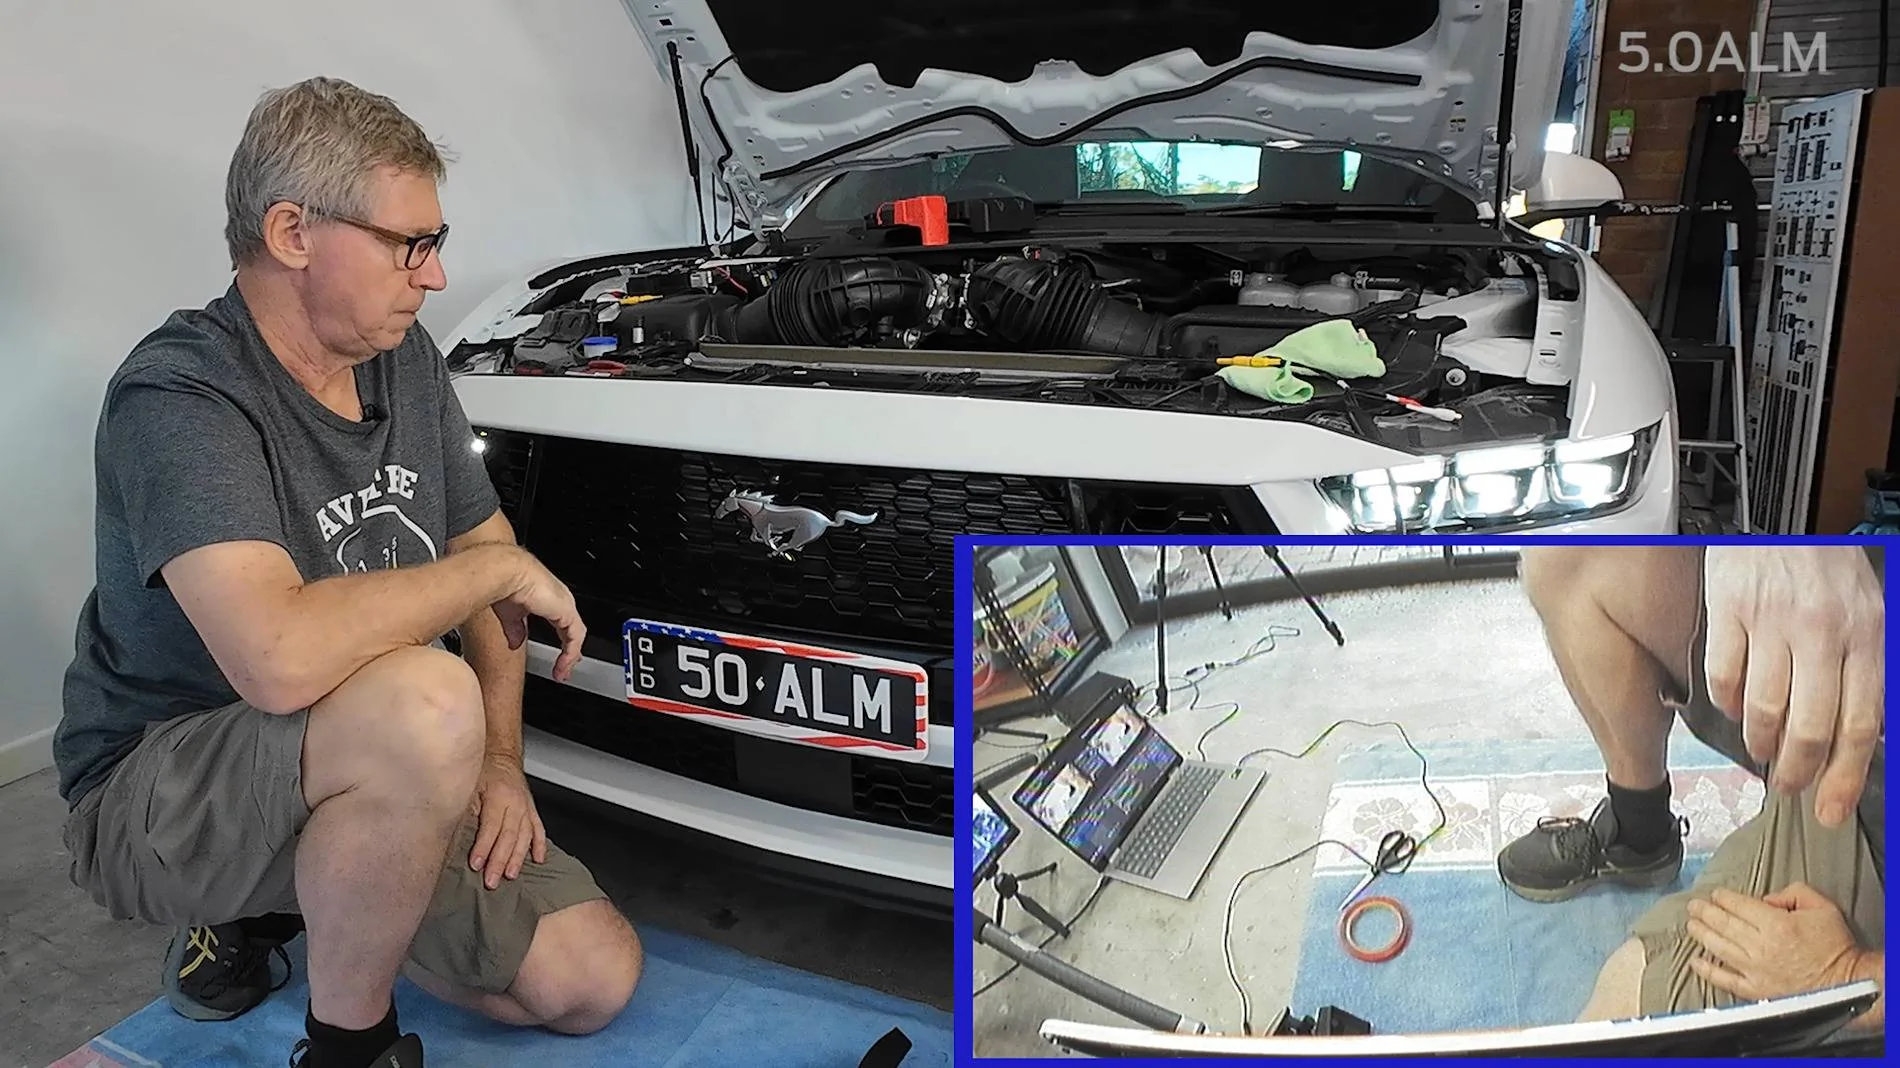
With the number plate at the bottom of the screen, the camera's FOV (field of view) placed the horizon (top of the screen) at about 1.8 meters away.
That just under 6 feet in imperial.
This is a good range for parking.
Granted, not as elegant as an OEM integrated system using the center screen, but it certainly does the job!
And it's better than nothing.
At the end of the day, it was two afternoon's worth of work using basic handyman tools most of us already have and some pieces of scrap aluminium to fabricate the brackets.
Aside from being over a solid week of editing (I'm not joking), this video runs 29 minutes.
I think I cover absolutely everything involved in this video, but apply any changes to suit your own circumstances.
Aside from bracket fabrication and installation, I discuss the unproven $$$ aftermarket solutions, why I don't use my phone as the display, and show three different parking demonstrations.
Grab your favorite beverage and enjoy.
I've been using this for several weeks now, and wouldn't be without it.
Ford should have ( ) implemented a front camera that is found in other Sync4 equipped vehicles, like with the higher-trim level Ranger and Everest we get in Australia.
Now I want something similar in my daily driver!
And finally, a shout out to @roket for providing feedback on the project, and putting me onto the looming tape.
It does help finish off the job nicely.
Hope this helps provide inspiration to others.
Front Parking Camera
I'm using a wireless reverse camera system as a front camera.
Wireless means there are no hassles getting cable through the firewall.
The camera system itself is inexpensive and works well, but some custom brackets had to be knocked up.
This was easy, using some scrap aluminium pieces that were on hand, and basic handy man tools.
Amazon - Wireless reversing camera kit - affiliate link (I may earn a small commission at no extra cost to you)
https://amzn.to/4kFyzIR
It was AUD$50 (USD$33) when I purchased it back in March 2025, but is AUD$40 at the time of writing.
The following Aussie store links are provided to show the items I used, but look for alternatives local to you.
Autobarn - Looming Tape
https://autobarn.com.au/ab/Autobarn...r-Builders-Underbody-Tape-19mm---UBT/p/142430
Autobarn - M6 Flange Head Bolts
https://autobarn.com.au/ab/Autobarn...-Flange-Head-Bolt-M6-x-16mm---FBM21/p/SP76970
Super Cheap Auto - Gloss Black Enamel Spray Paint
https://www.supercheapauto.com.au/p/polycraft-polycraft-metal-cover-gloss-black-300g/683480.html
See the camera?
The camera mounted to the home-brew camera mount, sprayed in gloss black enamel.
I think my mount blends in quite well, considering.
It could have been finessed more, but I just wanted to get it done.
It's held in place with 3M VHB double-sided tape.
This provides a good comparison between the supplied number plate bracket, their butterfly bracket, and my own home-brew butterfly mount.
You can see the extra down tilt required to get the result I achieved.
Corners could be cut if you can use the supplied brackets, but it's worth the effort making your own and getting it just right.
A wireless system eliminates any hassles trying to pass cables through the firewall.
I think the battery is located here on LHD vehicles, so you'd need to mirror this or find an alternative spot.
It is handy having the fuse box nearby to power the camera and transmitter though.
With the number plate at the bottom of the screen, the camera's FOV (field of view) placed the horizon (top of the screen) at about 1.8 meters away.
That just under 6 feet in imperial.
This is a good range for parking.
Granted, not as elegant as an OEM integrated system using the center screen, but it certainly does the job!
And it's better than nothing.
At the end of the day, it was two afternoon's worth of work using basic handyman tools most of us already have and some pieces of scrap aluminium to fabricate the brackets.
Aside from being over a solid week of editing (I'm not joking), this video runs 29 minutes.
I think I cover absolutely everything involved in this video, but apply any changes to suit your own circumstances.
Aside from bracket fabrication and installation, I discuss the unproven $$$ aftermarket solutions, why I don't use my phone as the display, and show three different parking demonstrations.
Grab your favorite beverage and enjoy.
I've been using this for several weeks now, and wouldn't be without it.
Ford should have (
) implemented a front camera that is found in other Sync4 equipped vehicles, like with the higher-trim level Ranger and Everest we get in Australia.Now I want something similar in my daily driver!
And finally, a shout out to @roket for providing feedback on the project, and putting me onto the looming tape.
It does help finish off the job nicely.
Hope this helps provide inspiration to others.
Sponsored